I know you subscribe to my Tech Tips to get pearls of wisdom and nuggets of knowledge. Not this week. This Tech Tip is just for fun. Hope you enjoy it.
Follow the blue ball through this impressive Rube Goldberg machine.
I know you subscribe to my Tech Tips to get pearls of wisdom and nuggets of knowledge. Not this week. This Tech Tip is just for fun. Hope you enjoy it.
Follow the blue ball through this impressive Rube Goldberg machine.
Do you use an iCloud email account? (iCloud email accounts can end in any of the following suffixes: Mac.com, Me.com or iCloud.com.)
Do some spam emails arrive in your Inbox? Apple’s spam filters are pretty effective, but nobody’s spam filters are perfect. Thus, if spam or phishing emails get past Apple’s spam filters and arrive in your Inbox, you can report them to Apple. Apple will then work on improving their spam filters. Read More from “Report Spam And Phishing Emails That Arrive In Your iCloud Inbox”
Do you have an HP Color LaserJet MFP M477 series printer? Is your printer displaying 59.F0 error on its touchscreen display? Online research indicates that this error message can indicate that your printer has experienced a hardware malfunction. However, sometimes, this error can be resolved by upgrading the printer’s firmware. Hewlett Packard makes a Mac application named HP Firmware Updater. However, this application can’t communicate with the printer when it is displaying this error message. Here are instructions that I received from HP that include alternate ways to install a firmware update. Read More from “Upgrade Firmware On HP MFP M477 Series Printer To Resolve 59.F0 Error”
Do you own AirPods, Apple’s wireless earbuds? Have you noticed that your AirPods do not hold a charge as long as when they were new? If so, this could be a sign that your AirPods’ internal batteries are worn out. All rechargeable batteries wear out from normal usage. This is just a fact of life. Did you know that Apple will replace your AirPods batteries for $49 (as of Nov 2019)? This is much less than the cost of a new pair of AirPods, which start at $159. Read More from “Replace Worn Out AirPod Batteries”
Does your small business have a Mac, in your office, working as a file server? Do you wonder if you should continue to do this or switch to a cloud-based file sharing system, such as Dropbox? Let’s look at some of the advantages and disadvantages of using Dropbox. In the past few years I’ve had a number of small business clients decide that they no longer want the expense of buying, supporting and backing up their own in-house file server. For them, Dropbox is a cost-effective solution. Dropbox may not be a viable option for every small business, but let’s consider the pros and cons.
This article compares Dropbox and file servers in the following areas:
Let me start by looking at the areas where Dropbox compares well against a file server.
1. Price
To improve the readability of this article, I’ve put all of the details of my price comparison as an endnote to this article. For my comparison I look at a hypothetical company with 3 employees and their costs over a 5 year period. I compare the costs of owning and maintaining a Mac setup as a file server with using Dropbox for their file sharing needs. Again, see details below.
This total cost of ownership for a Mac file server could be $5000 over a 5 year period.
The total cost of a Dropbox subscription is $3858 over a 5 year period.
Dropbox offers a noticeable price savings.
If we change our hypothetical company to 6 employees then the costs of the file server are likely about the same. However, our Dropbox costs would double to about $5600 over 5 years. Dropbox’s price savings appear to dwindle as the number of employees increases.
Price Conclusion – Depending upon the size of the company Dropbox may or may not offer a price savings. I think Dropbox’s price sweet spot is companies with 3-8 employees. As the number of employees increase, Dropbox makes less sense based on cost-alone.
However, Dropbox offers another price savings since no additional costs are required to access Dropbox when a staff person is out of the office. Typically a file server requires a business to setup a VPN. Let’s look at these costs.
2. Remote Access (Getting to your files when you are outside the office)
Let’s compare what is required to remotely access both Dropbox and a file server. More specifically, when employees are working from home or whenever they are out of the office, what is required to permit them to access shared folders? Dropbox has no additional costs or requirements. If your employees use laptops while at the office to access Dropbox then these laptops can be used, as is, anytime the employee has an Internet connection.
In our file server scenario, an employee’s laptop would need to be configured to use a VPN (Virtual Private Network) connection to be able to access the file server. Apple no longer offers a built-in VPN solution in their Mac server software. Thus, you will need to spend time and money setting up an alternative and then configure each of your employees Mac laptops and then train them on how to use the VPN.
Remote Access Conclusion – Dropbox wins since it does not require any additional costs, labor or training to allow employees to access files when outside of the office. Perhaps this cost savings furhter tips the balance in favor of Dropbox for overall costs.
3. Outside Sharing
Let’s imagine that you need to collaborate with others, outside your company, on a project. Perhaps you want your collaborators to be able to access a project folder which you store in Dropbox, or on your file server. Dropbox makes this pretty easy. You can give people outside your company access to a folder inside your Dropbox account. As long as the outsider is willing to setup his or her own free Dropbox account then they will have easy access.
Granting an outside person access to a folder on a central file server is possible, but you’d spend time creating a user account on the server and giving them VPN access to your company’s network. Many companies would not grant access to the network so that’s a show stopper. At this point, you’d likely start sending files back and forth as email attachments.
Outside Sharing Conclusion – Dropbox wins since Dropbox permits this while the file server model typically does not. However, it is important to note that setting up your folder structure appropriately is a key consideration if you are using Dropbox. Dropbox is only able to share folders at one level. This means you can’t have a parent folder that is shared with, say, one outside person outside your company and also have a subfolder shared with a different person outside your company.
Now let’s look at the areas where Dropbox does not look as good as a file server.
4. File Sharing Control
File servers support more complex file and folder permission configurations. For example, file servers let you setup a folder named Shared Projects, which is accessible by all of your employees and then create a folder within Shared Projects named Financial Reports that has more restrictive permissions. Maybe only the business owner and accountant might be able to access the Financial Reports folder. Dropbox can let you have both a widely shared Shared Projects folder and a more restricted Financial Reports folder, but Financial Reports can’t live inside of Shared Projects.
File Servers also typically create a number of logs that let one see who has accessed, edited or deleted a file. Dropbox Standard does not offer the same level of tracking. Some higher tiers of Dropbox Business do. Thus, there is much less accountability available for a small office using Dropbox. This type of accountability is often needed as the number of employees in a company grows, but it can be helpful even when there are only a handful of users.
File Sharing Control Conclusion – File servers offer great flexibility. There have been times when Dropbox’s restrictions have been a nuisance, but work-arounds are always possible. File access logs are a standard feature of file servers, but are only available on higher priced Dropbox accounts.
5. Various Security Considerations
With Dropbox, you hand over some control of your data since you’re entrusting your data to a middleman and since your data is accessible via the Internet. This increases the risk that somebody outside of your organization could access your data. First, Dropbox, the company, has a backdoor into your account. While I am pretty sure that Dropbox employees can not casually look at your files, I am also pretty sure that in order to provide technical support and test their own systems, select employees might access your account and could need to inspect certain files. I would also guess that if a subpoena was issued by the government that they could gain access to your data. You could encrypt select files in your account to try to reduce this risk.
This is a good time for me to mention that Dropbox encrypts your files during transit and storage, but the files stored on your Mac, in your Dropbox folder, are not encrypted unless you use a service like Boxcryptor or the Mac operating system’s FileVault.
Second, there is also a risk that the bad guys could get into your Dropbox account and access your files. One of your employees could be lured into divulging his or her Dropbox account password via a Phishing attack. Alternatively, Dropbox could make a goof as they did in 2011 when a programming flaw in Dropbox’s web site permitted anybody to get into anybody else’s Dropbox account. This flaw only existed for 4 hours, but it highlights the possibility.
Next, let’s think about corrupt files or accidentally deleted files. If your company runs its own file server then you control your own in-house and off-site backups. Thus, you can restore corrupt or damaged files. If your company uses Dropbox then you typically need to rely on Dropbox’s file recovery feature. Depending upon the type of Dropbox account you have, Dropbox provides you with 30-180 days of file recovery. In other words, if a file gets damaged or deleted, but this is not discovered for 30 or more days then there is a chance that you won’t be able to recover that file. This vulnerability could be minimized if you make your own backups of your Dropbox account. To be effective, one Mac in your office would need to have a copy of all of the files in your Dropbox account and then you would need to backup this Mac to one or more destinations. In other words, this one Mac cannot use Dropbox’s Selective Sync or Smart Sync features.
Do you realize that you could lose all of the files in your Dropbox account if your account expires? This might sound far-fetched, but it could happen. Let’s imagine that the credit card you use to pay for your Dropbox account has expired. Dropbox sends emails to remind you about a billing problem, but it is possible that these emails could be overlooked if one is traveling, sick or otherwise distracted. If your account were to expire, I am sure Dropbox does not delete your files immediately, but I do not know the length of the grace period. Thus, it is possible that your files could be deleted.
Do you have good policies and procedures in place when an employee leaves your company? If your company uses Dropbox, an employee could access your Dropbox account from his or her own personally owned computer, phone or tablet. When employee’s leave you should revoke access by any personally owned devices and initiate a remote delete of files from that device. If your company uses a file server, typically remote access requires VPN access. VPN access could be revoked easily for a given employee on his or her last day of employment.
Similarly, do you have good policies and procedures in place in the event a laptop, tablet or phone, with Dropbox access, is lost or stolen? My own laptop was stolen at the end of 2017. Because I had a number of security features enabled on my laptop, I was confident that the thieves could not gain access to any of the data on my laptop, including files I keep in Dropbox. You should make sure you have setup appropriate security policies on all devices that access Dropbox.
If your company uses a file server then typically all of the files do not reside on the laptop. Thus, if the laptop is secured and/or VPN use requires employees to manually enter a password in order to connect, your file server would be secure.
Various Security Considerations Conclusion – File servers tend to offer greater security since they are in your office and not on the public Internet, like Dropbox. Dropbox offers greater convenience, but this convenience comes at the cost of higher security risks. If you use Dropbox it is important to minimize these risks by having your own backup of your data and have good security procedures in place on your computers.
Overall Conclusion – Dropbox can be an appealing and cost-effective option for easily sharing files with your team and outside collaborators, but it does not make sense in all situations. Additionally, there are some additional security concerns that one needs to think through and protect against.
If this company wants to buy, backup and maintain their own Mac as a file server they might be looking at the following 5 year costs:
This totals $5000 over a 5 year period
Dropbox offers a few tiers of service but our fictitious company is going to select Dropbox Standard for Business, which currently costs $12.50 per user per month if paid annually. Let’s assume that Dropbox has a price increase during the middle of the 5 year period. I should note that Dropbox Business accounts have a minimum cost of 3 user licenses or $37.50
Let’s add a line item for supporting Dropbox. We have to assume that staff will need some Dropbox training and/or something will go awry and some time will need to be spent troubleshooting Dropbox. Let’s estimate this support cost at $300/year or $1500 over 5 years.
The total cost of a Dropbox subscription and technical support is $3858 over a 5 year period
In this hypothetical example, of 3 users for 5 years, Dropbox is less expensive than a file server.
Let’s image that our company now has 6 employees. The cost of the file server are likely about the same. However, our Dropbox subscription costs would increase to about $4600 over 5 years. With support this could bring the cost to about $5600. Thus, with 6 employees the cost of Dropbox is about the same as a file server.
If you had a company with a dozen employees you might find that Dropbox is more expensive than maintaining a file server. Our imaginary file server might require a beefier computer or be equipped with more storage space to handle 12 users so the file server costs would increase, but probably not at the same rate as Dropbox’s costs increase. Thus, the cost savings provided by Dropbox appear to dwindle as the size of the company increases.
Do you want to know if some of your passwords have been compromised? A good place to start is the Have I Been Pwned? web site. No, that’s not a typo. I meant to type pwned. It’s a derivative of owned. If you’re still scratching your head, then please read this definition of pwned. Read More from “Have Your Account Passwords Been Compromised?”
Is it time to replace your iPhone? If you don’t live near an Apple Store, or just want to do this migration yourself, please follow the guidance I provide in How To Migrate To a New iPhone. If you are not comfortable doing it yourself and you live near an Apple Store then you could let them help you. Here’s an overview of how the migration process will go and the things I recommend you do to prepare for your trip to the Apple Store. Every visit and migration will be a bit different, but I recommend that you plan on this taking 60-90 minutes. Read More from “How To Migrate To A New iPhone At The Apple Store”
Do you use either Parallels or VMWare Fusion on your Mac? Does your virtual machine use the Windows 7 operating system? If so, it’s time to retire Windows 7 and switch to Windows 10. Windows 7 was released in 2009 and Microsoft ended mainstream support for it in 2015. Microsoft is ending their extended support in January 2020; so no more security updates. Switch to Windows 10 which was released in mid-2015 and receives regular updates. There are a number of ways to switch from Windows 7 to 10. The exact steps are beyond the scope of this article, but here’s an overview of some options. If you’re using a current version of Parallels, it has a built-in menu command for helping you to upgrade to Windows 10. You should make sure you have a current backup of your Windows 7 virtual machine before you attempt to upgrade it. Alternatively, you might prefer to create a new virtual machine using Windows 10. If you choose this option then you should be prepared to reinstall any applications that you rely on, in your virtual machine, such as QuickBooks or RevIT.
Did you Mac fail to adjust its clock this morning when Daylight Savings Time ended? If so, please configure your Mac to automatically adjust it’s date and time, by doing the following: Read More from “Configure Your Mac To Automatically Adjust Its Clock”
Every fall for the past decade or so, Apple has released major updates to macOS and iOS, the operating systems used by Macs, iPhones and iPads. Despite Apple’s frequent reminders to install these major updates, I think it’s foolish to install them as soon as they’re released since they typically introduce significant change, may contain significant bugs and could cause some of your applications to stop working. Before installing a major Mac operating system (macOS) upgrade, I recommend waiting a couple of months, verifying that you have a full backup as well as verifying that your most important applications are compatible. Apple’s reminders can make it easy to mindlessly install these updates. Here are some things to be aware of, so you can try to avoid accidentally installing such upgrades, including the recently released macOS Catalina (aka macOS 10.15). Read More from “How To Avoid Accidentally Installing Major macOS Upgrades, Like macOS Catalina”
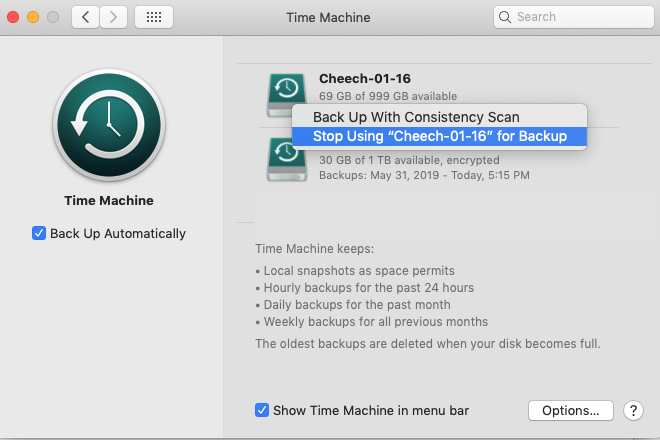
Do you use Time Machine to backup your Mac? Are you annoyed by messages from Time Machine indicating that it can’t backup to a hard drive that you no longer have? Here are instructions on how to remove a specific hard drive from Time Machine’s configuration.
If your Mac is using macOS 12 Monterey or older, use the instructions listed in Section 1
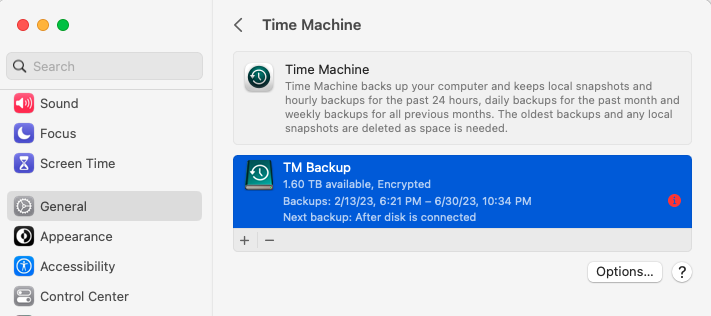
If your Mac is using macOS 13 Ventura or newer, jump to Section 2.
I strongly recommend that you configure your Mac to require a password when it is awoken from sleep or screen saver. It’ll take a minute or two to setup this feature and it’ll slow down a thief if your Mac ever gets stolen. Read More from “Require A Password When You Wake Up Your Mac”
Have you ever had your Mac or iPhone recalled by Apple? Fortunately, this is a rare event. I believe I have personally bought about 10 Macs over the past 35 years and 4 iPhones over the past 12 years. One of my Macs and one of my iPhones needed to be repaired under an Apple recall. Of course Apple does nott actually use the word recall. Instead, they call them Exchange and Repair Extension Programs. You can find all of Apple’s current repair programs on their web site. Read More from “List Of Apple Product Recalls And Repair Programs”
Do you own an older version of Photoshop, but not want to buy a subscription to use current versions of Adobe Photoshop? If so, here are some alternative image editors that are affordable and well reviewed. While many people find Apple’s Photos application adequate for their photo storage and editing needs, Photos is not sufficient for everybody. Adobe’s Photoshop and Photoshop Elements are two well-known alternatives but Photoshop has always been expensive and difficult to learn. If your needs exceed Photos but do not warrant Photoshop, you might find that Acorn, Pixelmator Pro, Graphic Converter or Affinity Photos meets your needs. Read More from “Alternatives to Adobe Photoshop For Mac Users”
Read More from “iPhone Gestures For iPhones Without Home Buttons, Like the iPhone X”
If you’ve upgraded your Mac to macOS High Sierra or macOS Mojave you have likely seen an alert that looks like the one shown below. I’ll explain what this alert means and how you should handle this situation.
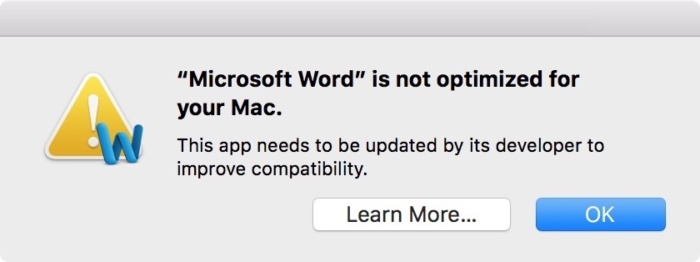
Microsoft Word 2011 is only one of many applications that can trigger this alert, but Word 2011 is, by far, the most prevalent application that triggers this alert. This alert has generated a lot of uncertainty. If one clicks the Learn More button, you’re taken to Apple’s article which offers a mildly technical explanation of the situation. It also outlines what steps you can take, but let me try to present a clearer explanation. Read More from “How To Handle “Word Is Not Optimized For Your Mac””
Do you use Safari as your web browser? Do you ask it to save the passwords you use to login to various websites? If so, did you know that you can view a list of these passwords? This is a handy way to look-up or retrieve some of your passwords. Read More from “View Your Website Passwords Saved in Safari”
Do you think your Mac abruptly installed an update to your Mac’s operating system on its own, without your permission? While it is possible for this to occur if you have automatic updates enabled, I have also had clients inadvertently instruct their Mac to install macOS updates. This occurs because people get confused by the choices that Apple offers them. In last week’s Tech Tip I show you how to disable the automatic installation of macOS updates. In this week’s Tech Tip, I’ll show you how to prevent the accidental installation of macOS updates. Read More from “How To Manage Apple Updates On Your Mac”
Would you like to make sure that your Mac is not configured to automatically install updates to the Mac operating system (macOS)? If so, follow the instructions for the version of macOS installed on your Mac. To determine which version you have installed, please click on the Apple menu, in the upper left corner, of your Mac’s screen, and choose About This Mac. The macOS version will be listed in the window that appears.
I do not enable and do not recommend the automatic installation of macOS updates. While I’m generally in favor of installing macOS updates, I like to control when they get installed. Inevitably, if the computer does it automatically it will pick an inconvenient time.
Have you ever visited a web site to discover that the site no longer exists? Or, have you wanted to view an older version of a website? It is possible to do this if you take a trip in the Wayback Machine. The Wayback Machine, also called the Internet Archive is a non-profit organization that is building a searchable archive of the Internet. Read More from “View Older Versions Of A Website”