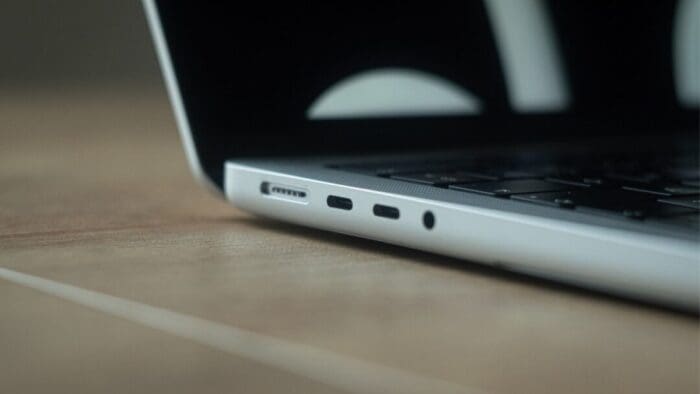
Would you like to create a curated collection of your photos, letters, recipes, audio files, text messages and other documents that you can share with family or friends? If so, consider taking Mirja Heide’s four-week course at Edmonds College starting Thursday May 18th from 6-8 PM. The course costs $99. In this course, you will learn how to set up a permanent online home for preserving your memories. You will be able to start to build a collection of your most cherished items.
Bring your Windows PC or Mac laptop to class if you’re able.
Instructional handouts will be provided and take-home assignments given each week.
This is troubling. Joanna Stern and Nicole Nguyen of the Wall Street Journal have published an article (paywalled) and accompanying video that describes attacks on hundreds of iPhone users in major cities throughout the United States. Some attacks involve drugging people in bars or even violence, but the most avoidable involve the thief or a confederate surreptitiously observing the iPhone user entering their passcode before snatching the iPhone and running.
However it happens, once the thief has a user’s iPhone and passcode, they change the user’s Apple ID password—which is shockingly easy for them to do. With the new password, they disable Find My, making it impossible for the iPhone’s owner to erase it remotely. Then they use Apple Pay to buy things and access passwords stored in iCloud Keychain. They can even look in Photos for pictures of documents containing confidential information, such as credit cards and ID cards. After that, they may transfer money from bank accounts, apply for an Apple Card, and more, all while keeping the user locked out of their account. Of course, they’ll resell the iPhone too. (Apparently, Android users are susceptible to similar attacks, but Android phones have a lower resale value, so they aren’t being targeted as much.) Victims have reported thefts of tens of thousands of dollars, and many of them remain unable to access their Apple accounts.
We fervently hope Apple addresses this vulnerability in iOS 17, if not before. At a minimum, Apple should require users to enter their current Apple ID password before allowing it to be changed, much as the company requires at the Apple IDwebsite. Plus, Apple would ideally do more to protect access to iCloud Keychain passwords from a passcode-wielding iPhone thief. (The closest we have now is a different Screen Time passcode, which can prevent account changes, but it blocks access to so many settings that most people will find it too annoying and turn it off.)
Although the chances of you falling prey to one of these attacks is vanishingly low, particularly if you don’t frequent urban bars or areas that suffer from snatch-and-run thefts, the consequences of a passcode theft are so severe that it’s worth taking steps to deter the malicious use of your passcode. With luck, you’re already doing many of these things, but if not, take some time to re-evaluate your broader security assumptions and behavior.
Pay More Attention to Your iPhone’s Physical Security While in Public
Most importantly, you don’t want to make it easy for a thief to grab your iPhone. Apart from a wrist strap, there’s no reliable way to prevent someone from snatching it from your hand. When you’re not actively using your iPhone, stash it in a secure pocket or purse instead of leaving it out on a bar or table. Many people are blasé about protecting their iPhones, so if you take more precautions, you’re less likely to have problems.
Always Use Face ID or Touch ID When Unlocking Your iPhone in Public
The easiest thing you can do to protect yourself from opportunistic attacks is to rely solely on Face ID or Touch ID when using your iPhone in public. If a thief sees you entering a passcode, you could become a target.
We know people who avoid Face ID or Touch ID based on some misguided belief that Apple controls their biometric information, but nothing could be further from the truth. Your fingerprint or facial information is stored solely on the devicein the Secure Enclave, which is much more secure than passcode entry in nearly all circumstances.
We’ve also run across people for whom Face ID or Touch ID works poorly—if that’s you, conceal your passcode from anyone watching, just as you would when entering your PIN at an ATM.
Use a Strong Passcode
By default, iPhone passcodes are six digits. You can downgrade that security to four digits, but don’t—that’s asking for trouble. You can also upgrade the security to an alphanumeric passcode that can be as long as you like, but that’s overkill, in our opinion. Video would still capture you entering it, and if you’re focused on entering it accurately, you’re less likely to be aware of someone shoulder-surfing behind you.
That said, make sure your passcode isn’t trivially simple. Basic patterns like 333333 and 123456 are far more easily observed or even guessed. There’s no reason not to use a passcode that’s memorable but unguessable, such as your high school graduating class combined with your best friend’s birth month.
Don’t Share Your Passcode Beyond Trusted Family Members
1Even those who don’t have motivated thieves targeting them need to be careful to protect their passcode. Our simple rule of thumb is that if you wouldn’t give someone complete access to your bank account, you shouldn’t give them your passcode. If extreme circumstances require you to trust a person outside that circle temporarily, reset the passcode to something they’ll remember—even 111111—and change it back as soon as they return your iPhone.
Switch from iCloud Keychain to a Third-Party Password Manager
Although Apple keeps improving iCloud Keychain’s interface and capabilities, having all your Internet passwords accessible to a thief who has your iPhone and passcode is unacceptable. Instead, we suggest you use a third-party password manager like 1Password or BitWarden (we no longer recommend LastPass). Even when a third-party password manager allows easier unlocking with Face ID or Touch ID (which both 1Password and BitWarden do), they fall back on their master password, not the device’s passcode. After you move your passwords from iCloud Keychain to another password manager, be sure to delete everything from iCloud Keychain.
Delete Photos Containing Identification Numbers
Many people take photos of their important documents as a backup in case the original is lost. That’s a good idea, but storing photos of your driver’s license, passport, Social Security card, credit cards, insurance card, and more in Photos leaves them vulnerable to a thief who has your iPhone and your passcode. With the information in those cards, the thief has a much better chance of impersonating you when opening credit cards, accessing financial accounts, and more. Instead, store those card photos—or at least the information on them—in your password manager.
A Security Wakeup Call
Again, although it’s very unlikely that you would fall prey to one of these attacks, we appreciated the encouragement to re-evaluate our security assumptions and behaviors, and we suggest you do the same.
Most of us rely on Messages every day to text with family, friends, and colleagues. Not surprisingly, we’ve fielded numerous questions surrounding common confusions with this popular app. We hope our answers here will help you use Messages more effectively and work around problems.
What’s the difference between blue and green bubble conversations?
A common question is why some conversations have blue bubbles and others have green bubbles. The answer is that the color indicates whether the conversation uses iMessage or SMS/MMS. Blue bubble conversations use iMessage and are solely between Apple users, whereas green bubble conversations are with friends using SMS/MMS on Android or other phones.
What are iMessage and SMS/MMS, and how do they differ?
Messages supports two protocols for text messaging: iMessage and SMS/MMS. Although the end result is the same, apart from the color of the conversation bubbles, the two are quite different.
SMS (Short Message Service) and MMS (Multimedia Messaging Service) are cellular technologies that require only a wireless plan from a cellular carrier. SMS is limited to 160 characters of text, though longer messages are usually broken into multiple segments and reassembled upon receipt. MMS enables sending of pictures, audio, video, and more, as long as the message size doesn’t exceed carrier limits, which range from 300 KB to 3 MB). Because SMS uses extremely small amounts of bandwidth, SMS text messages may get through even when cellular service is too weak to place a call, a useful fact to know in emergencies.
In contrast, iMessage is proprietary to Apple and works only in Messages on Apple devices, including the iPhone, iPad, Mac, and Apple Watch. Apple has said the size limit for a message is 100 MB, but people have transferred even larger files. That’s possible in part because iMessage relies on Internet access, which requires either Wi-Fi or a sufficiently strong cellular connection. If an Internet connection isn’t available for either party when you want to send a message using iMessage, Messages tries to fall back on SMS/MMS, which can result in blue and green bubbles in the same conversation.
How does Messages work on Apple devices that lack cellular connectivity?
It’s no problem for all Apple devices to use iMessage when they have Internet connectivity through Wi-Fi, but you can also send and receive SMS/MMS messages on a Mac or iPad that has no native cellular connectivity. Apple extends SMS/MMS support to Messages on such devices by routing through your iPhone. In the iPhone’s Settings > Messages > Text Message Forwarding, you can specify which of your devices can send and receive SMS/MMS messages through your iPhone.
Keep this setting in mind if you stop receiving SMS/MMS text messages on your Mac or iPad, for instance. It’s not unheard of for it to get turned off after a major operating system upgrade.
How are iMessages addressed, and can that cause problems?
As cellular technologies, SMS and MMS are tied to a phone number. iMessage, however, can send and receive messages from one or more phone numbers and email addresses. The first time someone sets up an iPhone, it registers that iPhone’s number with Apple’s iMessage servers. That’s why, when you type in a phone number to start a new Messages conversation, Messages knows whether to make the conversation blue or green.
Because iMessage also supports email addresses, you can start Messages conversations with a fellow iMessage user when all you know is their email address, as long as they’ve enabled that email address to send and receive messages.
In Settings > Messages > Send & Receive, you can specify which of your email addresses can receive messages and reply to them. If you want to be easily findable, select all of them, in addition to your phone number. Otherwise, turn off the email addresses you don’t want used. You can add an email address or phone number to this list on appleid.apple.com in Personal Information > Reachable At.
You can also specify which of your phone numbers or email addresses is used to start new iMessage conversations. In general, we recommend sticking with your phone number unless you plan to change it soon.
As you can imagine, changing these settings can cause problems. If you disable receiving for an email address used by an existing conversation, people in that conversation won’t be able to send you messages anymore. Even worse would be changing your main Apple ID address, which would break a lot of conversations, all of which would have to be started afresh with the new Apple ID.
Changing phone numbers is also problematic for the same reasons, though that probably happens less often. If you’ve temporarily attached a second phone number to your iPhone using eSIM while traveling, for instance, be careful how you initiate conversations from it because they’ll break as soon as you disable the associated plan.
Finally, switching from an iPhone to a non-Apple phone can cause delivery problems for SMS/MMS messages. To prevent that, either turn off iMessage in Settings > Messages before you switch or deregister iMessage online.
What happens when a message fails to send, and how do I fix it?
Occasionally, when you try to send a message, you may see one or more red exclamation points and an alert that says “Not Delivered.”
Most of the time, the problem is just poor connectivity, either for you or your recipient. First, just click an exclamation point and try again in case it was a one-time problem. If a second try doesn’t succeed, check your Internet connection in Safari, and if it seems to be working, tap Try Again. If you’re using iMessage and it remains stuck, tap Send as Text Message, which switches from iMessage to SMS. If that’s not it, there are a few other possibilities:
Make sure iMessage is enabled in Settings > Messages.
See if you have another phone number or email address for the recipient. If they disabled message receiving for the one you were using, that could cause failures.
If the problem occurs when sending to an SMS recipient while using a device without cellular connectivity, make sure the device is enabled in Settings> Messages > Text Forwarding.
If the problem occurs with an image or other file sent via MMS, it might be too large. If so, you may have to resort to email.
To ensure the iPhone isn’t temporarily confused, restart it (which is best done using Siri if you’re running iOS 16—just say, “Hey Siri, reboot.”) and try again.
Why do I see slightly different conversations on my iPhone and Mac?
With text message forwarding turned on for all your devices and each device logged into the same Apple ID, Messages should have the same conversations everywhere. In practice, that’s not always true, so Apple introduced Messages in iCloud, which uses iCloud as a centralized location for all messages. When it’s turned on, everything (other than failed SMS messages) should stay in sync.
Turn on Messages in iCloud in Messages > Settings/Preferences > iMessage on the Mac and in Settings > Your Name > iCloud > Apps Using iCloud > Show All > Messages on the iPhone or iPad. Make sure to enable it for every device.
Can someone eavesdrop on my Messages conversations?
SMS isn’t at all secure, so don’t use it for truly sensitive information (and whenever possible, use an authentication app instead of SMS for two-factor authentication codes). In contrast, Apple encrypts all iMessage conversations, so there’s no worry about someone listening in when you’re using a public Wi-Fi network at a hotel. However, iMessage conversations are not end-to-end encrypted by default, which means that law enforcement could compel Apple to turn over your data stored in its data centers. To provide full end-to-end encryption, Apple lets you turn on Advanced Data Protection for iCloud; the downside is that Apple can no longer help you recover your account if you forget your Apple ID password.
Other messaging apps also focus on security, most notably the free Signal, which is open source, provides end-to-end encryption, and lets you secure the app with an additional password. Messages can be set to self-destruct after a certain amount of time. The only downside is that you have to convince the people you want to message to use it. WhatsApp also provides end-to-end encryption, but you have to enable encryption for backups. It also shares a boatload of other information with Facebook to help it personalize ads, including your phone number, contacts, location information, device information, and more.
Don’t get the wrong impression—Messages usually works well. But on those rare occasions when you have problems, we hope this information explains more of what’s happening and helps you work around your issues.
(Featured image based on an original by iStock.com/fizkes)
There are many reasons you might want to get rid of apps from your iPhone or iPad. To begin, touch and hold on a blank spot on a Home Screen to enter “jiggle mode.” Then tap the ⊝ icon for any app to see the question about whether to delete the app entirely or merely remove it from the Home Screen. Delete the app if you don’t want to use it anymore or need to reclaim the space it occupies. (You can download it from the App Store again.) Remove the app from the Home Screen if you want to reduce clutter, keep the app on your device, and don’t mind opening it from the App Library (swipe left past all the Home Screens) or from Search (swipe down from the middle of the screen).
(Featured image based on an original by iStock.com/Photosbypatrik)
Phishing is becoming an ever more common way for people to get in trouble when using the Internet. A phishing attack is some communication, usually an email, that tries to lure you into revealing login credentials, financial information, or other confidential details.
A State of Phishing report from security firm SlashNext claims that there were more than 255 million phishing attacks in 2022, a 61% increase from the year before. Luckily, according to the Verizon Data Breach Investigations Report for 2022, only 2.9% of employees click through from phishing emails, but with hundreds of millions of email addresses targeted, the raw numbers are still high. We’ve been noticing—and hearing from clients—that phishing emails are also slipping through spam filters more than in the past.
To help you avoid falling prey to phishing tricks, check out our example screenshots below from real phishing emails, complete with annotations calling out the parts of a message that give it away. All phishing emails are trying to lure you into clicking a link or button to a website that will encourage you to enter your password or other confidential information. Once you realize that a message is a phishing attack, you won’t get suckered into clicking a link or revealing your personal information.
Fake Password Expiration Scam
Our first example is a password expiration scam—it’s trying to get you to click a button to keep your password from expiring. What’s ironic about this scam is that passwords should never expire—forcing users to change them regularly is terrible security practice. If a password is strong and unique, there is no reason to change it unless the site suffers a breach. Let’s look at what identifies this message as a phishing attack.
Note that the Reply-To address is generic and doesn’t match either the email domain used throughout the message or even a major email service provider, which would never send such a message.
Using your email address instead of your name is something scammers do to make the message seem personalized. If this email really came from your IT support staff, they’d be more likely to use your name or leave the email address out. And they’d never send such a message either.
The body of the message uses likely words, but they don’t quite sound like a native English speaker wrote them. The phrasing is slightly off, and quoting words like “send and receive” while not quoting the button name feels strange.
Be careful of things that look like buttons—we’re trained to click them without thinking. In many email apps, you can hover the pointer over a button or link to see where it will go. If you look at the URL at the bottom of the window, you can see that it’s completely different from any other domain listed—a clear sign that this is a phishing message.
“See full terms and conditions” is a strange thing to say in a password-expiration message. What terms and conditions could possibly apply? This is an example of someone who’s not a native English speaker throwing in random phrases they’ve seen elsewhere.
The copyright line is a similar tell. No organization would go to the effort of claiming copyright on a simple support message, and even if it did, it would use its name, not “Email server.”
Spurious Account Access Scam
Our second example pretends to be alerting you to a sign-in to your email account, with the goal of trying to scare you into resetting your password. Frankly, this phishing email stands a good chance of fooling people. You have no way of knowing if your account has been compromised, and if it were compromised, resetting your password is the right thing to do. However, never click through from an email to change a password! You can’t tell if you’re on the right site. Instead, navigate to the site manually, log in, and then change the password. Persuasive though this message is, it does make some mistakes.
The capitalization of “Mail” in the Subject and this line should give you pause. Most people wouldn’t capitalize the word, or they’d refer to something more specific, like your “Gmail” or “Outlook” account.
Another slight strike against this message is the specificity in the timestamp. There’s no reason to include the seconds or the time zone, and most normal people wouldn’t.
There are three mistakes in this line that could tip off a savvy Internet user. It claims to provide the IP address from which the sign-in occurred, but real IP addresses are four sets of numbers from 0 to 255. This one has five sets of numbers, the first of which is way too high at 719. The missing space before the parenthetical makes it look wrong, and finally, the parenthetical claim that the IP address is located in Moscow is overdoing it by invoking scary Russian hackers.
Note that the “reset your password” link doesn’t have an underline, unlike the other two links. Again, that could happen in a legitimate message, but it’s another slight tell. Hovering over the link reveals the fleek.ipfs.io URL at the bottom—clearly nothing associated with your email account and a dead giveaway.
A line saying “Please do not reply to this message” is commonplace in transactional messages, so it makes the message seem more real, but a real warning from an IT department would want to make sure you could contact the support staff.
Fraudulent DocuSign Confirmation
Our final example pretends to be confirmation of a document that you’ve already signed in DocuSign. That’s more clever than trying to get you to sign a document (which we’ve seen in other phishing messages) because most people won’t sign something without looking at it carefully. But you might want to see what document this message is talking about and be suckered into clicking through. What’s trickiest about this message is that it has merely changed some of the text in a real DocuSign message, so someone familiar with DocuSign might think it was real. But there are always giveaways.
The Subject line of this message is a tell because its grammar is atrocious.
The Reply-To address should also ring warning bells because it’s so generic that it couldn’t possibly go with an organization with which you were signing documents.
The yellow line claiming that the email has been scanned for viruses will likely seem unusual to you—even if an email app presented such a message, it likely wouldn’t do so in the body of the message.
There’s nothing wrong with the View Completed Documents button, which looks exactly as it would in a real DocuSign message. However, hovering over it reveals the URL at the bottom, which has nothing to do with docusign.net.
Someone familiar with DocuSign messages might notice that there’s no email address under “Administrator,” as there should be. But that’s a long shot, we know.
As with an earlier example, personalizing with an email address is a definite tell. A real person would have entered your name there, if anything.
Once again, the phrasing isn’t what a native English speaker would say, but even more problematic is how it asks you to sign the enclosed file, whereas the text and button in the blue box say that the document is completed. The mismatch is a complete giveaway.
We didn’t have room to show the rest of this message, which adds to the verisimilitude by continuing to copy text from a real DocuSign message. The two remaining tells further down are links that are empty when you hover over them and an unknown name in the fine print at the bottom, which reads (bold added for emphasis):
This message was sent to you by sefanya maitimoe who is using the DocuSign Electronic Signature Service. If you would rather not receive email from this sender you may contact the sender with your request.
Overall Advice
Let’s distill what we’ve seen in the examples above into advice you can apply to any message:
Pay close attention to emails that are very simple, like our second example above, because there’s less they might get wrong.
With legitimate-looking messages copied from large firms like DocuSign or PayPal, pay special attention to unfamiliar names and email addresses.
Don’t click anything in an email unless you’ve given it a close-enough look that you’re sure it’s legitimate. It’s too easy to skim and click without thinking, which the scammers count on.
Read the text of messages with an eye for capitalization, spelling, and grammatical mistakes. Scammers could write correct English, but if they don’t speak the language natively, they’re likely to make mistakes.
Evaluate any claim about something happening within your organization against what you know to be true. It’s always better to ask someone if passwords need to be reset or accounts are being deactivated instead of assuming a random email message is true.
Fight the urge to click big, legitimate-looking buttons. They’re easy to make and hard to resist, but if you can preview the URL under one before clicking, it will often reveal the scam.
None of our examples fell into this category, but if an email message is just an image that’s being displayed in the body, it’s certainly fake.
With Wi-Fi security, it’s easy to fall into the “out of sight, out of mind” trap. Your Wi-Fi router probably lives in a corner or closet, and of course, Wi-Fi’s radio waves are invisible. But the ease of connecting your devices to your Wi-Fi network means it’s equally as easy for a hacker to connect to your network and eavesdrop on your traffic. Or rather, it’s easy unless you take advantage of the security options available in every Wi-Fi router.
Before looking at those options, let’s discuss the importance of securing your wireless network. The fact is, we all send sensitive data over Wi-Fi and onto the Internet. That data includes passwords, financial information, and personal details, all of which could be used for identity or outright theft. For those who work at home, it may also include important corporate credentials and information. In addition, if your Wi-Fi network is open for everyone and has a bandwidth cap, you could be throttled or incur additional charges due to extra usage from someone using your network without your knowledge. Worse, someone could engage in illegal activity from your network, potentially putting you at legal risk.
Here are six ways you should secure your Wi-Fi network, plus another that’s usually not worth the effort. Exactly how you go about these tasks varies depending on your Wi-Fi router, but they should all be easy to accomplish.
1. Change Your Wi-Fi Router’s Default Password
Every Wi-Fi router has an app- or Web-based administrative interface where you can adjust settings, including security options. The first thing you should do when setting up a new Wi-Fi router is change the password for accessing that admin interface. (And if you didn’t do that when you set up your current Wi-Fi router, go do it now. Immediately. We’ll wait.) The default passwords are well known to hackers, who can use them to take over routers and turn off all the other security settings.
2. Change the Default Network Name (SSID)
Every Wi-Fi network has a name—technically an SSID, or Service Set Identifier. There’s no security benefit in changing it to anything in particular, but you should change it from the default name. That’s because default names often identify the router’s manufacturer, such as “Netgear” or “Linksys,” and some routers have known vulnerabilities or password styles that make it easier to break in. Of course, the main advantage of changing the network name is that it makes it easier to pick out from any other nearby networks.
3. Update Your Wi-Fi Router’s Firmware
Wi-Fi router manufacturers frequently fix security vulnerabilities and release new firmware versions. Check to make sure your Wi-Fi router has the latest firmware available, and if there’s an option for it to update its firmware automatically, turn that on.
4. Disable WPS (Wi-Fi Protected Setup) If Possible
When you connect a new device to your Wi-Fi network, you need to enter your Wi-Fi password. That’s entirely reasonable, and Apple devices automatically offer to share that password with your other Apple devices and other people in your Contacts. More generally, a technology called Wi-Fi Protected Setup (WPS) was designed to enable connecting without typing the Wi-Fi password, either by entering an 8-digit PIN or pressing a button on the router. The button is fine—no one can connect without physical access to the router. But the PIN is horribly insecure and can be brute forced with readily available cracking software. If your router supports WPS—not all do, happily—turn it off entirely.
5. Create a Guest Network
You’ll probably want to give visitors access to your Wi-Fi network so they can get to the Internet. The best way to do that is to create a guest network—a feature in nearly all Wi-Fi routers—separate from your main Wi-Fi network. It has a different name and password, and its traffic is isolated from yours, ensuring that even if a hacker were to access it, they wouldn’t be able to eavesdrop on your communications. It can have a simpler password since all it’s protecting is your bandwidth. One additional tip—put “Internet of Things” devices like smart appliances, video game consoles, and the like on your guest network to ensure they don’t provide access to your main network’s traffic if they’re hacked. You probably won’t want to do that with HomeKit devices, which will work better on the same network as your Apple devices.
6. Use Strong WPA2 or WPA3 Encryption
After changing the default admin password, this is the second-most important piece of Wi-Fi security advice. All traffic on a Wi-Fi network can (and should) be encrypted so hackers can’t eavesdrop with impunity. The first wireless security protocol was WEP (Wired Equivalent Privacy), which was commonly used from the late 1990s through 2004. Unfortunately, WEP is so easily broken today that it’s no longer considered secure. If you still use WEP, immediately switch to WPA2 (Wi-Fi Protected Access). There’s also WPA3, which is even more secure but is available only in hardware sold in the last few years.
Don’t Bother Hiding Your SSID
Finally, you may see suggestions that you should hide your Wi-Fi SSID, which prevents nearby devices from displaying it when they list available networks. That might seem like it would improve security, but all it does is prevent the sort of people who aren’t a threat anyway from seeing it. Anyone with the necessary software and skills to break into an unprotected or weakly protected Wi-Fi network can still detect and access a hidden network. They might even be more interested in what’s there, given that the network owner took the trouble to hide it. As long as you follow all the other advice in this article, there’s no benefit in hiding the SSID as well.
Bonus Advice: Use a VPN When on Public Wi-Fi Networks
Ensuring the security of your Wi-Fi network is essential, but what about public Wi-Fi networks in coffee shops, hotels, and airports? Because they’re open to anyone within range, they’re insecure by definition, and anyone on the network could theoretically see any other user’s traffic. Don’t panic. Most Web connections now use HTTPS, which encrypts traffic between you and the destination site (look for https at the start of URLs or a lock icon in the address bar of your Web browser). To ensure that all traffic is protected from prying eyes, use a VPN (Virtual Private Network), which creates an encrypted pipe from your computer to a VPN server elsewhere. Many organizations provide or even require VPN use so that traveling or remote employees can’t inadvertently use unencrypted connections. If your organization doesn’t have a VPN now but would like to set one up, contact us.
Do you use CrashPlan to backup your Mac? If so, CrashPlan version 11 was released earlier in March. CrashPlan should be granted a permission known as Full Disk Access so it’ll be able to backup any file. CrashPlan released a 3 minute video containing instructions on how to grant Full Disk Access. The instructions vary slightly if you’re using macOS 12 Monterey or older or macOS 13 Ventura or newer. In the video, the instructions for macOS 12 Monterey and older start at the 40 second mark. The instructions for macOS 13 Ventura and later start at the 2 minute and 10 second mark.
Apple makes it easy to share contact cards on the iPhone or iPad—just scroll down in a contact and tap the Share Contact button. But what if you don’t want to share every piece of data on that card? To avoid oversharing in iOS 16 or iPadOS 16, tap the small and easily overlooked button named Filter Fields. Then deselect the items that you don’t want to share. If the card has a lot of data and you want to share only a few items, tap Deselect All Fields at the bottom of the sheet and select only what you want to share. Unfortunately, your selections aren’t remembered if you share the same card again later, so be sure to reset your selections each time you share.
Do you use Backblaze to backup your Mac? It’s a great way to create an off-site backup of your Mac’s data.
Backblaze tends to automatically install minor updates but it won’t install major upgrades on its own. Here are instructions on how to manually install a major upgrade of Backblaze on your Mac, such as upgrading from version 7.x to version 8.x or version 8.x to version 8.5
Apple has long provided a microphone button in the keyboard to invoke dictation on the iPhone and iPad. But, it wasn’t always easy to hit, and you had to switch back to the keyboard to fix the inevitable mistakes. (Apple’s dictation is a huge timesaver but far from perfect, particularly with homonyms and proper nouns.) With iOS 16 and iPadOS 16, Apple made the microphone button larger and repositioned it to make it easier to tap. More importantly, the keyboard remains available while dictation is active, enabling you to work with text manually during dictation. You can fix mistakes, reposition the insertion point, select and delete text, and so on. For instance, if dictation inserts the wrong word, double-tap the word to select it and speak the replacement. Or, if you want to add something, tap in the text to move the insertion point and start speaking again. Dictation can even add punctuation for you, but it’s a little haphazard at that, so you might want to disable that option in Settings > General > Keyboard.
Everyone—or at least everyone reading this article—knows how to use a Web browser. But just because you can click links, search for websites, and type URLs doesn’t mean that you’re surfing the Web as smoothly and effectively as you could. We all have sites that we visit regularly—a local newspaper, perhaps, or a social media service that’s the only place to connect with far-flung family members. Plus, the rise of Web apps like Google Docs means that we may spend hours every day in a Web browser at a particular site.
Here then are six ways that you can make it easier to use the same sites every day. This list is far from comprehensive, but we hope it gets you thinking about how you can spend less time typing URLs and searching for sites. We’ll focus on Safari here, but similar features are available in most Web browsers.
Bookmarks
Many of you probably know about bookmarks, so let this serve as a nudge to remember how useful they can be. Dating from the earliest days of the Web browser, bookmarks are the original way to simplify revisiting a site.
In Safari on the Mac, save a bookmark by navigating to a page and then choosing Bookmarks > Add Bookmark. See your full list in the sidebar by choosing Bookmarks > Show Bookmarks. Click one in the list to load it. On an iPhone or iPad, tap the share icon and tap Add Bookmark; on the iPad, you can also drag a tab to the sidebar when it’s displaying bookmarks. You can see and visit your bookmarks by tapping the Bookmark icon in the toolbar (iPhone ) or the sidebar (iPad ).
Favorites
To make a particular bookmark even easier to access, add it to your Favorites. On the Mac, you can display the Favorites bar underneath the Location bar (View > Show Favorites Bar) and then click bookmarks for quick loading. Create a new favorite by putting a bookmark in the Favorites folder when you create it or by dragging it in later.
On the iPhone and iPad, favorites appear when you tap the Location bar, and adding a favorite is as simple as choosing Add Favorite instead of Add Bookmark in the share sheet.
As long as you have Safari enabled in your iCloud settings, your bookmarks and favorites sync among all your Apple devices.
Home Screen Icons
Want to go one step further? You can turn a Web page into a Home Screen icon on the iPhone or iPad. To set this up, just as with a bookmark, you navigate to the page and tap the share icon. Then select Add to Home Screen.
The Mac doesn’t have the same concept of Home Screen icons, but if you drag the URL for a Web page from the Location bar to your Mac’s Desktop, it will turn into a Web Internet Location file with a .webloc extension. It’s a normal file that you could put in the Dock, a Finder window’s toolbar, or anywhere else you want. Open it to load its page.
Bookmark Folders
Bookmarks and favorites are great for a site or two, but what if you want to open the same handful of sites every morning to get your daily dose of news and comics? Put all those sites in the same folder in the Favorites folder, either by adding them to the folder when you create them or by dragging them in afterward.
Once you have collected the desired bookmarks, you can open them all in new tabs by clicking the folder on the Favorites bar and choosing Open in New Tabs (or just Command-click it). If you don’t want it on your Favorites bar, the folder can live anywhere in your bookmarks—just Control-click it and choose Open in New Tabs.
This feature is available on the iPhone and iPad as well. Once the folder is in your Favorites, tap the Location bar and then touch and hold the folder. Choose Open in New Tabs from the menu that appears.
Tab Groups
Web browser makers were apparently unsatisfied with letting users open all the bookmarks in a folder in new tabs because they have come up with a similar feature called tab groups. Let’s say you’re researching new speakers to buy, and you want to compare options from different companies. Once you have open tabs for all the sites, you can open the sidebar in Safari on the Mac or iPad and use the Add Tab Group icon at the top to create and name a new tab group.
From then on, it appears in the sidebar, and when you select it, those tabs load automatically, replacing the ones that were there before (which are stored as another group). The feature is also available on the iPhone, where you must tap the tab icon in the toolbar first. Unlike a folder of bookmarks, when you close a tab in a tab group, it disappears, and if you want it back, you have to open it again manually.
Pinned Tabs
Perhaps you have several sites that are so important to you that you want them open at all times. For such situations, you can pin tabs to those sites. The utility of pinned tabs is that they stay in place even when you open a new window or quit and reopen Safari. Plus, if you click a link to a different website in a pinned tab, it opens in a new tab—pinned tabs always show the website you pinned. On the iPhone, where there’s no tab bar, pinned tabs live at the top of the tab screen. Each tab group can have its own pinned tabs.
To pin a tab in Safari on the Mac or iPad, drag an open tab all the way to the left in the tab bar until it shrinks into a tiny box showing only the site’s favicon. Or, on the Mac, Control-click the tab and choose Pin Tab (shown below). On the iPad, touch and hold the tab and select Pin Tab. To pin a tab on the iPhone, tap the tab icon first and then touch and hold a tab and select Pin Tab.
So there you have it! None of these features are particularly new, but they’re easily overlooked, and from what we’ve seen while watching people browse the Web, lots of people could benefit from them.
Earlier this year, some of my clients received an email from Google reminding them that they have Web & App Activity turned on. Those with a healthy dose of caution were concerned that it might be a phishing attack, but no, it’s legitimate. Their next questions were often, “Wait, what is Web & App Activity, and do I want it enabled?” Here are some answers.
On occasion, we all need to scan a document—an invoice, a recipe, instructions from a book—but far more people have an iPhone or iPad than a hardware scanner. Luckily, Apple has built a scanning capability into iOS, iPadOS, and macOS for some years now. The next time you’re faced with a piece of paper that you need in digital form, follow the instructions below.
When upgrading to a new version of macOS, I err on the side of caution, at least in my recommendations. I regularly tell people that you typically don’t want to be the first kid on your block to upgrade to a new version of the Mac operating system (macOS). Upgrading is easy, but if you upgrade too soon, the new macOS version could make key apps inoperable, create workflow interruptions, or cause other negative consequences. On the other hand, waiting too long can cause problems—it’s important to stay in sight of the cutting edge for security reasons and to take advantage of Apple’s advances. Upgrading is not an if question; it’s a when question. Since Apple recently released their second update to macOS 13 Ventura, feel free to upgrade, if you’d like as long as you have a current Time Machine backup and you know your applications are compatible. I discuss both of these topics below.
In early December, Apple made a surprise announcement: Advanced Data Protection for iCloud. It’s not as though iCloud’s standard data protection is problematic, but it hinges on one architectural decision that makes some iCloud data theoretically vulnerable: Apple holds the encryption keys necessary to decrypt iCloud data. Because Apple controls those encryption keys, an attacker or rogue Apple employee who could gain access to them could theoretically steal iCloud data. (There are many more safeguards; it’s not like there’s a big printout of keys anywhere.) Plus, since Apple has the technical capability to read that data, law enforcement agencies could legally compel Apple to hand it over.
Photos has long provided a hidden album you could use to hold images you wanted to keep a little more private. Until this year, however, it was security through obscurity: anyone who knew to reveal the album in Settings > Photos on an iPhone or iPad or by choosing View > Show Hidden Album on the Mac could see its contents. Now you can protect it—and the Recently Deleted album—with Face ID or Touch ID on an iPhone or iPad, or Touch ID or your password on a Mac. You can enable this feature in iOS 16 or iPadOS 16 using Settings > Photos > Use Face ID/Touch ID; in macOS 13 Ventura, choose Photos > Settings > General and select “Use Touch ID or password.” From then on, opening those albums will require authentication.
This is a hands-on course. You will have the opportunity to organize your digital photos using your iPhone during class as well as between classes via take-home assignments. Class handouts with step-by-step instructions will be provided.
With a handful of press releases buttressed by a 19-minute video, Apple unveiled its new M2 Pro and M2 Max chips and announced updated Mac mini and MacBook Pro models that rely on the new chips. There are no significant design or feature changes with these updated models, just faster performance, enhanced external display support, and support for the latest wireless connectivity standards. The new Mac mini and MacBook Pro models are available to order now, with units in stores and orders starting to arrive on January 24th.
Then, in another surprise announcement, Apple announced the second-generation HomePod, which updates the full-size smart speaker with a few new features and likely makes it more cost-effective to produce.