Backing up your iPhone or iPad is important because it permits you to recover all of your applications, personal data including photos stored on the device. It also allows you to recover text messages and call history on the iPhone. Apple provides two ways to backup your iPhone or iPad and I typically recommend using both methods.
You can backup an iPhone or iPad to either your Mac or Apple’s iCloud servers. You can also choose to use both. Using both methods provides the best protection and ability to recover from a variety of possible disasters. Let’s look at the pros and cons of each method. It’s important to know that automatic backups can only occur to either iCloud or your Mac, but not both. I typically recommend that users automatically backup to iCloud then manually backup to their Mac. It’s also possible to set up automatic backups to one’s Mac then manually backup to iCloud. Read through the pros and cons that I outline for each option to help you select your preferred backup scheme.
iCloud
By far the easiest way to backup your iPhone or iPad is to enable automatic iCloud backups. Here are some brief instructions. On your mobile device open the Settings app, tap on your name (this assumes you’re using iOS 12 or newer), tap on iCloud (login if needed), tap on iCloud Backup. Slide the control next to iCloud Backup to the On position.
Backups to the iCloud servers will then occur daily when your mobile device is plugged in, locked, and connected to the Internet through a Wi-Fi (wireless) network. Plugged in and locked means that the device is plugged in to a charger and its screen is dark (asleep).
Apple provides an overview of iCloud backups which lists what is backed up. It backs up everything that you’d care about, including photos and movies taken by the iPhone or iPad, other app data, text messages and voicemail messages. iCloud backups are great since they happen automatically every day, provided the conditions listed previously are met. Additionally, having an iCloud backup provides a convenient way to migrate to a new device while at the Apple Store. If your mobile device ever breaks or you buy a new device, you can simply turn on the replacement device, login to your iCloud account and follow the prompts to restore all of your iCloud backup data onto your new device. This can be amazingly handy if you’re traveling when your device breaks or gets lost. If you can buy a replacement device while traveling, you can get back up and running quickly by restoring from an iCloud backup.
There are some potential downsides to iCloud backups. iCloud only includes 5 GB of storage space for free. This can fill up quickly, especially if you don’t remove photos and movies from your iPhone or iPad’s Camera Roll. iCloud only keeps one or two backups, thus, it’s not possible to retrieve data that has been both deleted from the mobile device and removed from the backup by being over-written by a more recent backup. It’s rare that I’ve needed to retrieve such information from an older backup, but it has occurred a couple of times.
Another potential downside to iCloud backups is that Apple will delete those backups after 180 days without any notification.
Consequently, I typically recommend that people augment their iCloud backups with manual backups on their local Mac. Since your Mac is hopefully backed up every day to an external hard drive using Time Machine, we will have plenty of copies of your iPhone or iPad backup. And your Mac’s hard drive will certainly have room to backup more than 5 GB of stuff if your mobile device’s Camera Roll is bloated.
Mac
Again, other web sites provide detailed instructions for setting up automatic backups to your Mac, but here are some brief instructions for manually backing up your mobile device. Connect your iPhone or iPad to your Mac using its USB cable. Open iTunes if it doesn’t automatically open. Locate your iPhone or iPad’s button in the upper left corner of iTunes and click on it. You’ll then see an overview of your device, similar to the one below. Click the Back Up Now button.
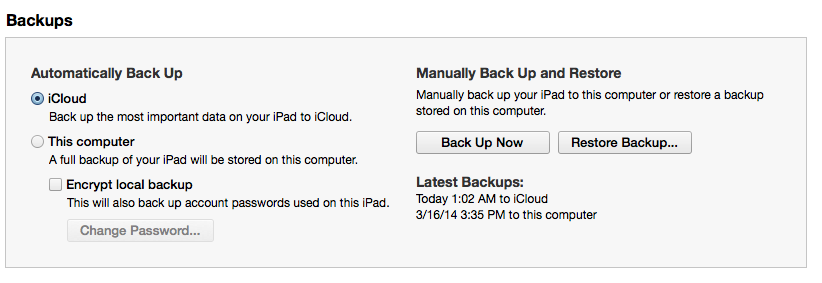
There are a few other useful things I can point out in this image. There’s a setting on the left which lets you switch automatic backups between iCloud and your computer. On the right, you can read the summary showing the most recent backups to iCloud and your computer. I check this regularly to make ensure that automatic iCloud backups are working and that I have a recent manual backup on my computer as well.
Another potential downside to backing up an iPhone or iPad to iCloud is that the data is outside of their control since it’s stored on Apple’s iCloud servers. Some users would prefer to backup their iPhone or iPad only to their Mac. If one backs up only to one’s Mac then one has to regularly connect their iPhone or iPad to their Mac. To encourage this good behavior I like to have people plug their mobile device’s USB cable into their Mac and use this cable to both backup their device and charge its battery. These two things will occur concurrently. Another advantage to doing things this way is that the mobile device will sync with your computer. This can ensure that photos, music, apps, and other items can be moved between the mobile device and Mac.
I wish Apple would permit automatic backups to both their iCloud servers as well as a local computer. Currently that’s not an option so the next best option is automatic backups to one of these two and manual backups to the other. Hopefully you’ll now feel well informed to make decisions about setting up both automatic and manual backups of your iPhone or iPad.