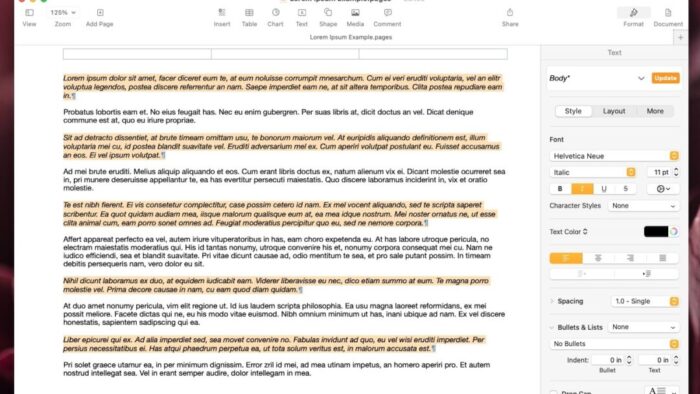
Do you have some older Apple products, like an iPad, iPhone, Mac or Apple Watch that you no longer use? If so, you can send them to Apple and get either a credit towards a future purchase or an Apple Gift Card. When I learned this recently, it was news to me. For years, Apple has allowed you to trade-in your older Mac, or older iPad when you purchase a new Mac, iPhone or iPad, but I wasn’t aware that they had expanded this program.
Read More from “Trade-in Your Apple Devices For An Apple Gift Card”Upgrade Backblaze 7 to BackBlaze 8
Do you use Backblaze to backup your Mac? It’s a great way to create an off-site backup of your Mac’s data.
In September 2021, Backblaze version 8 was released. Backblaze tends to automatically upgrade itself, but for reasons I haven’t been able to identify, Backblaze version 7 doesn’t seem to always upgrade itself to version 8. Here are instructions on how to manually upgrade your Mac to Backblaze version 8. Version 8 requires OS X 10.9 Mavericks or higher, including macOS 11 Big Sur.
Read More from “Upgrade Backblaze 7 to BackBlaze 8”Are You Prepared To Have Your iPad or iPhone Stolen?
A client recently had his iPad stolen, but he was prepared because he had the Find My feature enabled and he was backing up his iPad to iCloud. Do you have these features enabled? These features are useful whether you get your iPad back or not. If you don’t get your iPad back then the Find My feature can be used to lock and/or erase your iPad, and the iCloud backup can be used to restore your apps, data and accounts onto a new iPad. If you do get your iPad back the Find My feature might have helped you locate it and the iCloud Backup feature can be used to restore your apps, data and accounts if you erased your iPad as a precaution.
Read More from “Are You Prepared To Have Your iPad or iPhone Stolen?”How To Identify USB Cable Connectors
Are you confused by the assorted USB cables that you’ve accumulated over the years? Do you need to be able to name or identify the type of connector you have on one end of your USB cable? The image above shows most of the USB connectors that have been used since USB debuted around 1998.
Read More from “How To Identify USB Cable Connectors”Enabling FileVault On Your Mac
One of the best ways to protect the files on your Mac is to enable FileVault. It is a feature of the Mac operating system (macOS) which performs on-the-fly encryption and decryption of all of your personal files when you save them and open them again. The beauty of FileVault is that this encryption and decryption occurs behind the scenes. All you have to do is enable it. Your interaction with your Mac won’t change. You’ll have the added protection without having to do anything differently. In the event that your Mac is stolen, a thief won’t be able to access your files. FileVault provides much more protection than merely using a password on your user account. Read More from “Enabling FileVault On Your Mac”
Determining Your Hard Drive’s Fullness
Since a very full hard drive can produce unwanted and erratic behaviors on a Mac, I typically recommend keeping at least 10% of your hard drive’s capacity available. In other words, you want your internal storage to be less than 90% full.
Determining the fullness of your Mac’s hard drive is not as easy as it used to be. For many years, one could click on the Apple menu, select About This Mac, click the Storage button and see a summary of their Mac’s hard drive fullness. This summary no longer provides the full picture since it doesn’t mention purgeable space. Instead, it’s better to use the Get Info command to determine the fullness of one’s hard drive.
Meaning Of Weak Security Warning On iPhone Or iPad
Apple added a new alert in iOS 14. Your iPhone or iPad will alert you if your wireless (Wi-Fi) network is using weak security. To elaborate, this alert means that your Wi-Fi router is using an older encryption technology to protect the information flowing to and from all of the devices connected to your Wi-Fi network. The warning looks like the one shown below.
More specifically, your iPhone or iPad will display this alert if your Wi-Fi router is using any of the following outdated encryption technologies: WEP, WPA, or WPA2 (TKIP). Currently, only WPA2 (AES) and WPA3 are considered secure. Read More from “Meaning Of Weak Security Warning On iPhone Or iPad”
Recycling Appliances In Seattle
Do you live in the greater Seattle area and have any large or small appliances that you’d like to recycle? Check out Friendly Earth. Previously, I’ve written a half dozen or more articles about how to recycle various items in the Seattle area. To the best of my knowledge, none of the groups that I’ve mentioned recycle large and small appliances. I recently had a need for this. Fortunately, a client pointed me towards Friendly Earth. Here’s a full list of what they do and don’t accept. I was very interested to learn that they recycle all of the following:
Appliances (Large & Small)
Air-conditioners
Barbeques/Grills
Calculators and Adding Machines
Dishwashers/Trash Compactors
Dryers
Generators
Lawnmowers
Microwaves
Speakers
Stereos
Televisions
Washing Machines
AirPort Express Replacement Options
AirPort Time Capsule Replacement Options
M1-Based Macs Have New Startup Modes: Here’s What You Need to Know
For many years, Macs have relied on sets of keys held at startup to enable specific modes. Most notably, pressing Option displays the Startup Manager and lets you pick a boot drive, Command-R starts up from macOS Recovery, Command-Option-P-R resets the NVRAM, Shift starts up in Safe mode, D opens Apple Diagnostics to check the hardware, and T starts up in Target Disk Mode. Needless to say, obscure key combinations aren’t the friendliest way to help someone who may already be stressed out about their Mac not working, so Apple improved things for the new M1-based Macs.
The most important part is that you no longer have to press a key combination during startup. Instead, press and hold the power button until the screen shows “Loading startup options…” and displays the Startup Manager.
Unfortunately, Apple is still a little fast and loose with terms, so we’ve tried to list all of the ones you might see.
Startup Manager / Startup Disk
If you have multiple boot drives and wish to switch among them, you’ll want to use Startup Manager. Immediately after you see “Loading startup options…,” the Mac displays the new Startup Manager, which shows icons for all the bootable drives, along with buttons for Options, Shut Down, and Restart. To boot from a particular drive, select it and click Continue under it.
If you work your way into macOS Recovery but then want to back out in order to select a startup drive, look in the Apple menu for a Startup Disk command, which provides similar functionality with a slightly different look.
Startup Manager (but not Startup Disk) also lets you start up in Safe mode and set a drive as the default to use for booting. First, select a drive. Then, for Safe mode, press the Shift key and click the Continue in Safe Mode button below it. To set a selected drive as the default, press the Control or Option key and click the Always Use button underneath it.
Note that M1-based Macs can’t boot from just any external drive. We’re all still learning about the new platform, but it seems that you need a Thunderbolt 3 SSD that has been freshly formatted with APFS and set up with a new installation of macOS 11.1 Big Sur. See Howard Oakley’s writeup for details.
macOS Recovery / Recovery
When you need to reinstall macOS or restore from a Time Machine backup, head to macOS Recovery. From the Startup Manager screen, select Options and click Continue underneath it. After you choose a language, an initial macOS Recovery screen appears. Note that you have access to the Apple menu, which lets you choose Startup Disk, Restart, or Shut Down, and to the Recovery Assistant menu, which includes a potentially useful Erase Mac command.
macOS Recovery presents you with a list of users. Select one for which you know the login password, click Next, and enter the password when prompted. Now, in the Recovery app, you can restore from Time Machine, reinstall Big Sur, launch Safari to browse the Web and get online help from Apple, and open Disk Utility to manage drives.
The Recovery app has a full set of menus, and notice Utilities in particular. It lets you launch the Startup Security Utility, to reduce the macOS security level, or Terminal, if you want to run command-line tools before startup. (The old macOS single-user mode accessible by holding down S at startup has disappeared.) To return to the Recovery app from any other app, quit the current app. Finally, note that the Recovery app’s Window menu has an option for Recovery Log. As is often the case with logs, it may be inscrutable to all but high-level support experts.
Oddly, once you’re in macOS Recovery, there’s no way to return to the Startup Manager.
Target Disk Mode / Share Disk
If you ever want to access one Mac’s drives from another, you can connect the two Macs via a USB or Thunderbolt cable and use Target Disk Mode. On M1-based Macs, you initiate Target Disk Mode using a command in the Recovery app’s Utilities menu: Share Disk.
Choose Utilities > Share Disk to start sharing one of the M1-based Mac’s drives via Target Disk Mode. Select the drive and click Start Sharing. When you’re done using it, click Stop Sharing before disconnecting the cable.
Apple Diagnostics / Diagnostics Loader
If you’re worried that your M1-based Mac is suffering from a hardware failure, running Apple Diagnostics may shed some light on the problem. Oddly, getting to Apple Diagnostics still requires a hidden keystroke.
Once you’re in the Startup Manager screen, press and hold Command-D to reboot the Mac into the Diagnostics Loader app. You can choose to run the diagnostics offline or to share the information with Apple.
After you pick one, the diagnostics run right away and report back when they’re done. If you have an M1-based MacBook Air or MacBook Pro, make sure to plug it in first, or you’ll get an error telling you that the power adapter couldn’t be found.
The troubleshooting approaches that no longer seem to be available in any way are to reset the NVRAM (Non-Volatile RAM) or the SMC (System Management Controller). Apparently, the NVRAM tests itself at startup and resets automatically if necessary. M1-based Macs reportedly don’t have an SMC in the same way as Intel-based Macs, so there’s no option to reset it.
(Featured image by Apple)
Replace Your Apple AirPort With Eero Pro
Are you still using an Apple AirPort wireless router to create your home’s Wi-Fi network? If so, you are overdue for a replacement. Apple last’s major upgrade to their AirPort products was around 2012 when they introduced products that supported the fourth generation Wi-Fi protocols. Apple discontinued all AirPort products in April 2018. Not surprisingly, lots of improvements have occurred in Wi-Fi technologies since 2012, so you’d be much better served by replacing your aging AirPort Express, AirPort Extreme or AirPort Time Capsule. I suppose it could be a testament to the quality of Apple’s products that so many AirPort devices are still functioning and that they continue to receive the occasional firmware update from Apple.
In many circumstances, I tend to recommend replacing your AirPort Express or Extreme devices with Eero Pro devices, very often an Eero Pro 3-pack. Check out these other Tech Tips if you’re replacing an Airport Time Capsule or replacing an Airport Express.
Apple Shows You How To Make Beautiful Photos and Movies Using Your iPhone
I know you subscribe to my Tech Tips to get pearls of wisdom and nuggets of knowledge. Not this week. Here’s a fun and possibly educational video from Apple. Apple posts some interesting content on their Apple YouTube channel and on the Apple Support YouTube channel. In mid-November they released a cool video named Everyday Experiments. Get creative at home. At a minimum, I think you’d enjoying watching this 4 minute long video. Perhaps you’ll be inspired to try to replicate some of the photos or movies, or maybe you’ll just learn a some features of the iPhone’s camera that you weren’t aware of. Check it out.
What Is Purgeable Space?
Is your Mac’s hard drive getting full? Have you ever noticed that Apple designates some of your storage space as purgeable space? What is purgeable space? Apple introduced the concept of purgeable space in macOS 10.12 Sierra. If your Mac is using macOS Sierra or newer, you can easily see if it has so-called purgeable space. Click once on the Macintosh HD icon to select it. Click on the File menu, then select Get Info. Use the image below as a guide.
Delete A File Immediately On Your Mac–Bypass Trash
Did you know that you can bypass using your Mac’s Trash and simply delete a file immediately? Somehow I failed to learn that Apple added this feature in 2015 with OS X El Capitan (aka OS X 10.11).
Deleting a file is usually a two step process. First, move the file to the Trash, then empty the Trash. This two step process adds some safety. If deleting a file were a one-step process, this could increase the chance of accidentally deleting the wrong file. Now that Apple has provided a one-step process, please use it carefully. Read More from “Delete A File Immediately On Your Mac–Bypass Trash”
How To Enable COVID Notifications On Your iPhone
On November 30th Governor Inslee of Washington State announced the availability of WA Notify, a COVID exposure notification system. I encourage you to enable this feature on your iPhone using the instructions below.
If you’re not familiar with COVID exposure notification apps, check out my previous Tech Tip about COVID exposure apps. If you have concerns about your privacy and how these apps work, you can read 9to5Mac’s detailed explanation about how privacy is maintained by these apps. Or, for a quick overview read Washington State’s page about how WA Notify works and maintains privacy.
Here’s how to enable COVID exposure notifications on your iPhone:
- Tap on Settings
- Scroll down to and tap on Exposure Notifications (This feature was added in iOS 13.5. If your iPhone doesn’t list this feature, consider upgrading.)
- Tap “Turn On Exposure Notifications”
- Select United States
- Select Washington
Once you’ve enabled this feature, if you change your mind you can tap on Turn Off Exposure Notifications. Or, if you test positive for COVID then you can tap Share a COVID-19 Diagnosis.
The Seattle Times also wrote about the new WA Notify System.
It’s Time To Remove Adobe Flash From Your Mac
If you haven’t already removed Adobe Flash Player from your Mac, now is a great time to do this. Adobe Flash was once the primary format for animations and video clips on the Web, but Apple never permitted Flash on their iPhones and iPads. I believe this marked the start of the shift away from Adobe Flash player about 10 years ago.
Three years ago, in July 2017, Adobe announced that it would retire Flash Player. Flash’s retirement has arrived. Adobe will stop distributing and updating Adobe Flash as of December 31, 2020. Thus, since the middle of 2017, the writing has been on the wall for any web site developers who hadn’t already removed Flash from their website to do so now.
I removed Flash Player from my Mac about a year ago and I haven’t encountered any web sites that have required it since. Here’s a bit of guidance on how to remove Adobe Flash Player from your Mac. Read More from “It’s Time To Remove Adobe Flash From Your Mac”
Please Hold Off From Installing macOS Big Sur For A While
On November 12, 2020, Apple released the next version of the Mac operating system (macOS). It’s name is macOS Big Sur. Like all major operating system upgrades, it’s prone to have some significant bugs and/or will make some of your older applications incompatible, so please hold off on installing this major upgrade for a while. If you’re a customer and you subscribe to my remote monitoring, maintenance and support service (RMMS), you don’t need to worry about accidentally installing macOS Big Sur since I’m able to remotely block this major upgrade from being installed on your Mac.
[Update May 2021: If you’re one of my RMMS clients, you’re now able to upgrade to macOS 11 Big Sur if you’d like. I have removed my blocking mechanism. Before you upgrade, please be aware of the significant changes Apple made to the user-interface and follow my suggestions in this article to try to proceed cautiously. ]
Read More from “Please Hold Off From Installing macOS Big Sur For A While”
Fix CrashPlan’s Error: Logged Out By Authority. Invalid Application State
Do you use CrashPlan to backup your Mac? After migrating to a new Mac have you experienced CrashPlan giving the following error message?
Logged Out By Authority. Invalid Application State.
If so, here are general instructions on how to fix this problem.
Sign in to your account at CrashPlan’s web site.
Download the most current installer for CrashPlan.
Use the uninstaller application that’s provided with the installer to uninstall CrashPlan from your Mac.
Remove the CrashPlan folder and its contents, if they exist, from the two following locations: /Library/Application Support/ and ~/Library/Application Support/
Use the CrashPlan installer application to install CrashPlan.
Open CrashPlan. You should be prompted to go through the process of setting up the Mac as a new device or transferring from an existing device. Most likely, you want to transfer from an existing device. Follow the prompts to complete the process. You’ll likely be prompted to sign-in a couple of times as well.