The ease of sending and receiving email makes it an attractive way to run scams like phishing attacks. One telltale mark of a phishing attack is the sender’s address not matching their purported domain; attacks that appear to come from legitimate email addresses are much more likely to fool the victim.
You can protect your organization’s email accounts from being compromised and used in phishing attacks by training your users to identify forged emails and use password managers, which won’t autofill a password on a malicious site. But how do you prevent bad guys from forging email that looks like it comes from inside your organization? You can’t, but you can reduce the chances that other email servers will accept it. In the process, you’ll enhance the deliverability of legitimate email from your domain.
The rest of this article is aimed at two types of readers. The first is the IT professional who needs an overview of email authentication technologies and pointers to helpful tools. For other readers, this article will give you an idea of what’s involved so you can talk more knowledgeably with your IT staff or better appreciate what they manage for you.
Whether your email is hosted at Microsoft 365 or Google Workspace, or managed by your Internet service provider or IT department, if your organization has its own domain for email addresses——you need to know about and set up three authentication technologies: SPF, DKIM, and DMARC:
- SPF, which stands for Sender Policy Framework, lets you specify which servers and domains are allowed to send email for your organization. It allows receiving mail servers to verify that incoming messages from your organization are actually from you.
- DKIM, or DomainKeys Internet Mail, adds a digital signature to every message sent from your organization. Receiving mail servers can use your public key to verify that messages actually came from you and were not changed in transit.
- DMARC, which expands to Domain-based Message Authentication, Reporting, and Conformance, leverages SPF and DKIM to publish policies that tell receiving mail servers what to do with messages that fail authentication: deliver, quarantine, or reject them. A message fails DMARC authentication only if it fails both SPF and DKIM—only one is necessary for the message to pass DMARC’s checks.
These three authentication technologies exist inside DNS (Domain Name System) records. The primary use of DNS is to link your human-usable domain name with the underlying IP addresses of the servers that manage your Internet presence; for example, matching www.yourcompany.com with an IP address like 192.168.1.23. However, DNS can also contain TXT records with additional information about your domain—you configure SPF, DKIM, and DMARC using TXT records.
These TXT records must be carefully constructed to work correctly—an incorrect configuration could cause email failures. You could build them manually, but it’s safer to use a tool that asks you questions and spits out a correctly formatted TXT record for you to add to your DNS configuration. If all that sounds intimidating, work with your ISP or email service provider, or ask us for help. But here are the basics.
Tools abound for creating SPF, DKIM, and DMARC records, but we recommend those from DMARCLY and EasyDMARC. We’ll use DMARCLY for the examples here, and it provides a comprehensive explanation that’s worth reading if you want more depth.
SPF
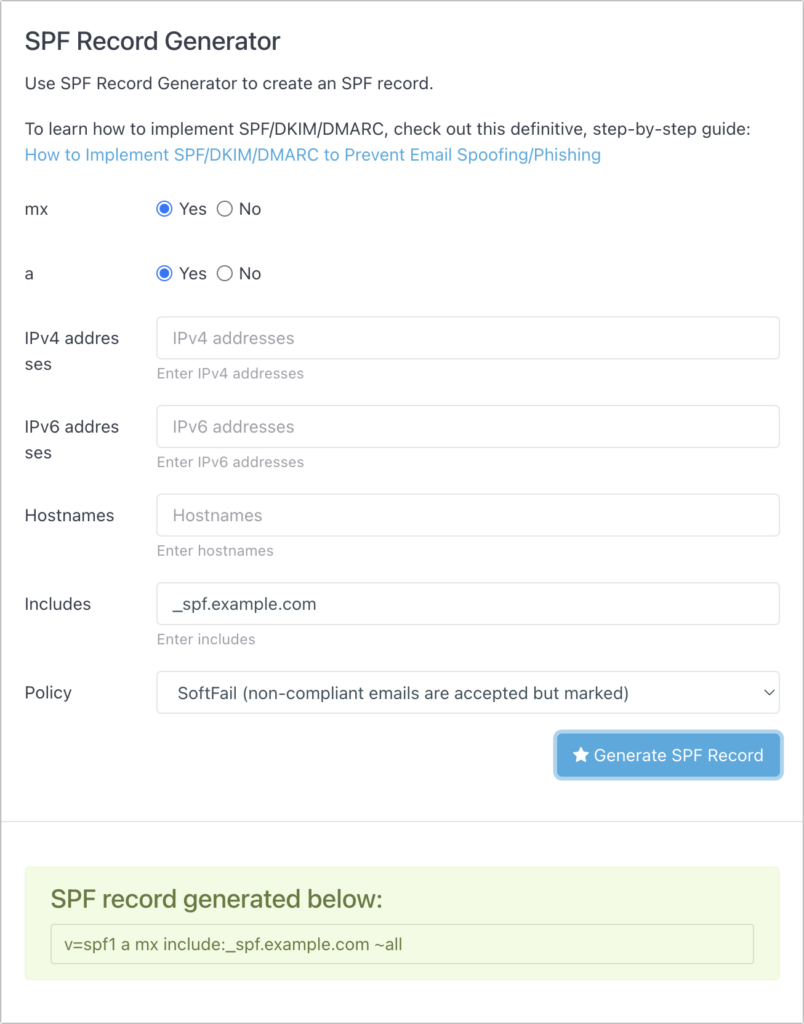
SPF is the oldest of these technologies. To get started, all you need to do in DMARCLY’s SPF Generator tool is specify the names or IP addresses of servers that are allowed to send email from your domain. The mx (mail exchanger) and a radio buttons automatically add the servers listed in your DNS records, and anything you put in the Includes field will allow email sent from anything allowed by a third party that sends email on your behalf. It’s common to put Google, Amazon SES, SendGrid, or other systems there. The IPv4, IPv6, and Hostnames fields let you specify other allowed servers, but aren’t necessary.
The Policy menu is important—you can choose from Fail, SoftFail, and Neutral. Start with Neutral, which should allow messages to be accepted (it prefixes all in the TXT record with a ?). Then bump up to SoftFail (a tilde ~ prefix) to have messages accepted but marked. When you’re confident everything is working correctly, move to Fail, which uses a - prefix.
DKIM
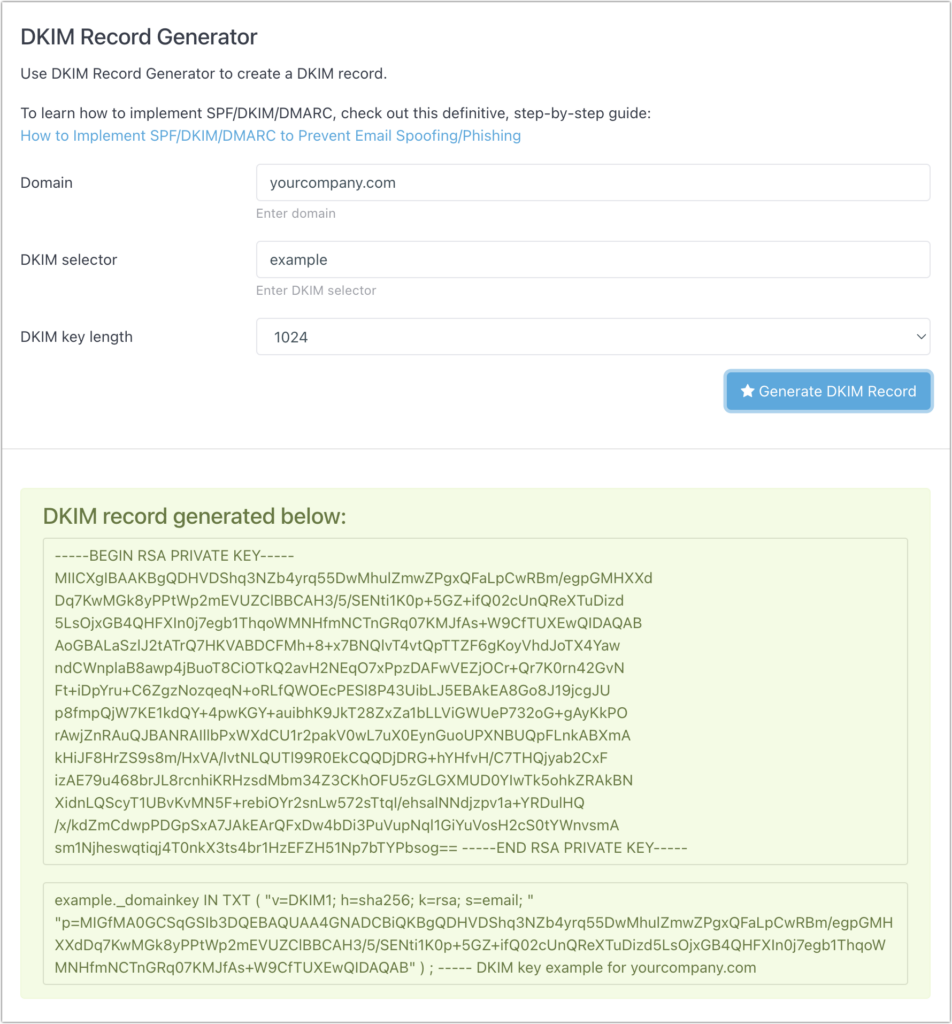
Because it relies on public key cryptography, DKIM is significantly more complicated. Although DMARCLY’s DKIM Generator tool will generate the necessary public and private keys, that’s not helpful unless you have full control over your email server and know how to install the private key to sign all your outgoing email. It’s much more likely that you’ll use a tool managed by the company that hosts your email to create your keys. That tool will automatically install the private key and give you the necessary details to add to a TXT record in your DNS settings.
DMARC
Where SPF and DKIM are all about authenticating email messages, DMARC lets you say what happens when authentication fails. DMARCLY’s DMARC Generator tool makes it easy to generate your DMARC record. For Policy and Subdomain Policy, you can choose None, Quarantine, or Reject—those specify what will happen to messages that fail both SPF and DKIM authentication. Start with None to see what happens in your reporting, move to Quarantine, and if everything seems OK, end up at Reject.
To set up reporting, enter an email address in the Aggregate Email field, but don’t put a personal address there. DMARC reports are daily XML digests that aren’t human-readable, so they should be sent to a service that will parse them and provide you with a dashboard for exploring the problems. DMARCLY and EasyDMARC both offer dashboards, as does the Cloudflare service if you use it for DNS or other tasks. To start, you can leave DMARC’s Strict Alignment and Forensic Options blank.

Configuring DNS
Once you’ve generated your SPF, DKIM, and DMARC records, you have to configure them in your DNS settings. How you do that depends on your DNS host; we’ll show what it looks like Cloudflare. Other DNS hosts should be similar.
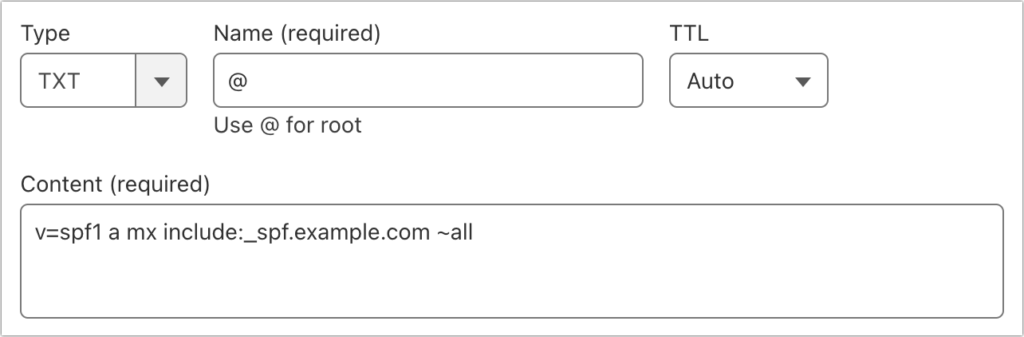
For each case, you’re creating a TXT record, but what goes in the Name and Content fields varies:
- SPF: The name for an SPF record should be the
@character, signifying the root level of your domain. Paste the text that the SPF Generator tool created in the Content field. You can have only one SPF record for each domain, although you can set up separate SPF records for subdomains.

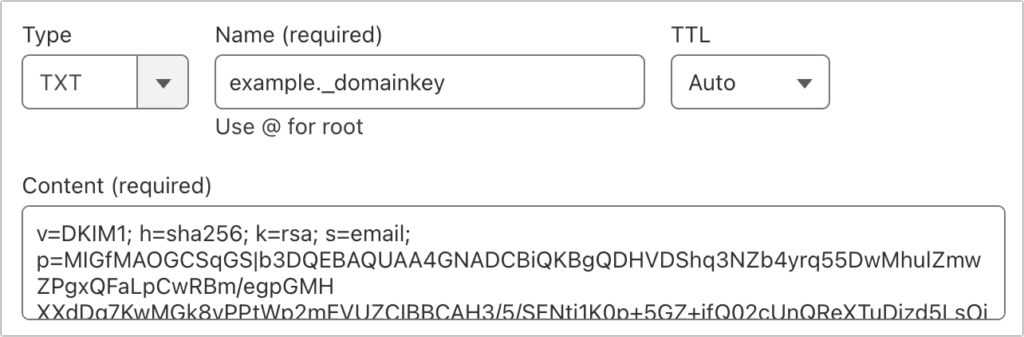
- DKIM: You can have as many DKIM records as services that send email on your behalf, so the first part of the name can vary—we show
examplebelow. However, the._domainkeypart is required for each DKIM record. For the content, paste the text given to you by the email-sending service. Note that some email services may require you to create one or more CNAME records instead of a TXT record—just follow their instructions.
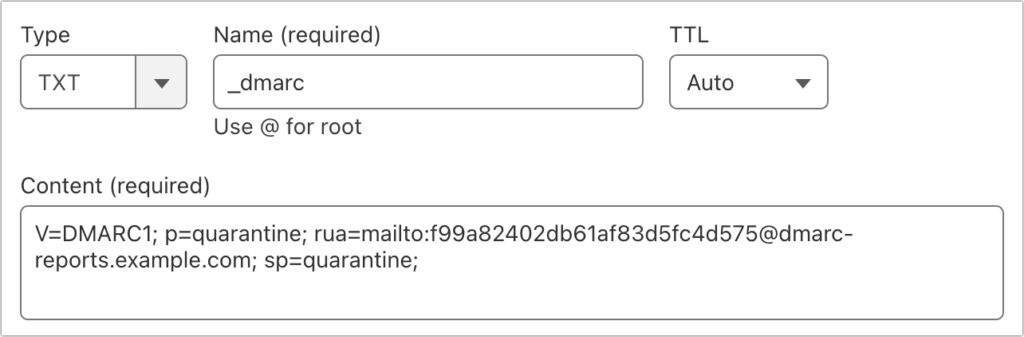
- DMARC: For DMARC, the name must be
_dmarc. Once again, you’ll paste the text given to you by the DMARC Generator tool in the Content field.
Reporting and Evaluation
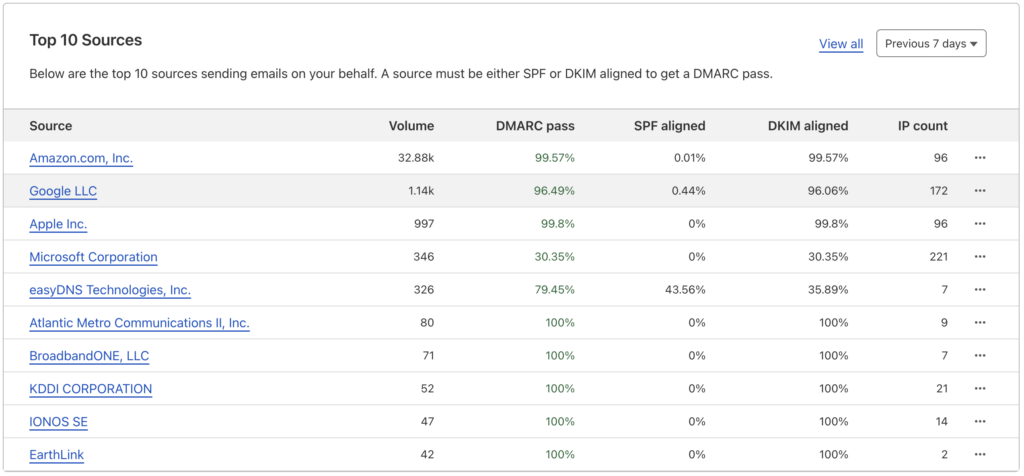
After you set up SPF, DKIM, and DMARC, it’s essential to keep an eye on your email. If you’ve started with SPF in Neutral mode and DMARC in None, nothing should go wrong. You can look through the headers of test messages you send to verify. This DMARCLY article explains what to look for. If you’ve signed up for an aggregate reporting service, you’ll be able to see reports like this one from Cloudflare that show the percentage of email that passes each of the authentication technologies.
If everything looks good and most email passes, change SPF to SoftFail and DMARC to Quarantine. Make sure you can send email to some known personal addresses on Gmail, Yahoo, or iCloud. Also, tell people who send email from your domain to be on the alert if they don’t hear back from someone who typically replies quickly—if a misconfiguration is causing your email to be marked as spam, you want to know about that quickly. If you’re using a DMARC reporting service, look at those reports to see if any email services are sending a lot of messages that fail DMARC.
After you’ve run with those settings for a month or two, bump SPF up to Fail and DMARC to Reject. Continue to monitor your DMARC reporting and pay attention to any complaints from users about the messages they send not arriving.
That’s a lot, we know. Feel free to contact us if you need help with any step of the process.
(Featured image based on an original by iStock.com/Ole_CNX)