Do you use Apple’s Mail application on your Mac? Do you want to remove one of your email accounts from Apple Mail? This process isn’t difficult, but there are a couple of non-obvious steps. Here are instructions for removing an email account from Apple Mail.
These instructions work for OS X version 10.7 to macOS 13. For macOS 14, the on-screen location of the items described varies slightly, but everything is still there. I’ll start these instructions by highlighting the two non-obvious steps. First, one doesn’t directly remove the email account from within the Mail application; instead the account is removed from Internet Accounts within System Preferences. Second, after removing the account, it’s recommended, but not required that you manually remove the outgoing (SMTP) server, which is done within the Mail application.
- Quit the Mail application
- Click on the Apple menu and select System Preferences (System Settings in macOS 14)
- Click on Internet Accounts
- On the left-hand side, click on the email account that you want to delete
- Click the minus sign icon located in the lower-left corner.
- You’ll be asked if you’re sure if you want to do this. If the iCloud Keychain feature is enabled on your Mac then, instead, you’ll be asked if you want to remove this account from all of your devices that use iCloud Keychain, or if you only want to turn off this email account on this Mac. Click the Remove From All button if you really want to delete this account from all of your devices.
- Re-open the Mail application, you’ll notice that your email account is no longer listed. As long as you have at least one other email account still setup in Mail then it’ll open and let you continue with the next step.
- Click on the Mail menu and select Preferences
- Click the Accounts button from the row of icons that appears at the top of the Preferences window.
- Click on any of the email accounts listed on the left-hand side.
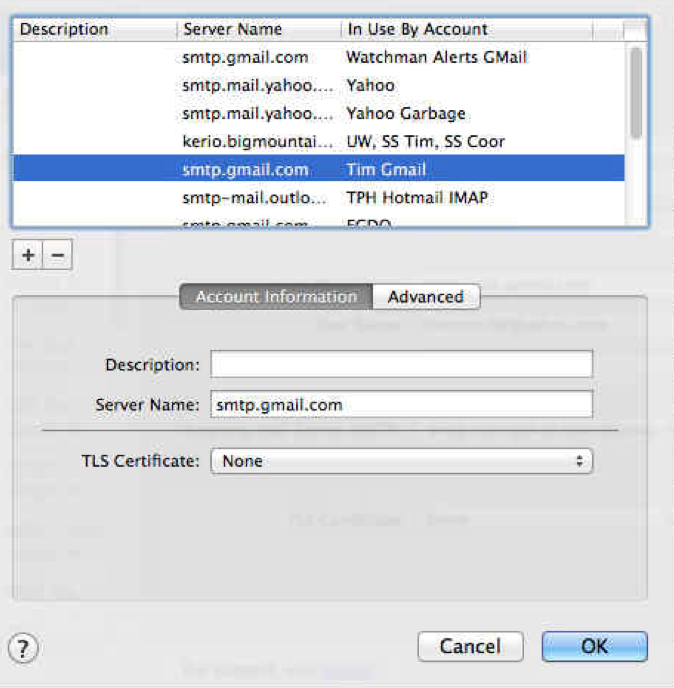
- This step varies based on the version of the Mac operating system you have. If you have macOS 10.12 or higher, then click on Server Settings then click on the pop-up list that appears in the Outgoing Mail Account section and select Edit SMTP Server list. If you have OS X 10.7-10.11 then click on Account Information, then click on the pop-up list that appears in the Outgoing Mail Server section and select Edit SMTP Server list. You should be looking at a window similar to the one below. You’ll see that most of the servers listed have a corresponding account listed in the In Use By Account section. However, at least one mail server will not be in use by any of the email accounts. Click on the mail server that you want to remove and then click the minus sign icon.
- Click the OK button when finished. Click the red dot to close this window
1. It doesn’t indicate whether all mails to the deleted account will be preserved or deleted.
2. It doesn’t tell how to delete an email account in a previous version (and mainly in El Capitan)
Yes, deleting an email account from the Mail application will definitely delete all of the mail in that account. If you don’t want to lose those email messages then you could consider unchecking the Active checkbox that appears in the accounts settings, within Preferences. My instructions do cover El Capitan since it is also known as macOS version 10.11 -Tim