Are you retiring an older Mac that has a mechanical, spinning hard drive and its running macOS version 10.7 or higher? If so, here are instructions on how you can securely erase the Mac’s hard drive before you donate your Mac or sell it.
The Mac operating system (macOS), version 10.7 and newer, includes a feature called the Recovery Partition. This is a normally invisible part of the Mac’s hard drive. The Mac can start up from the Recovery Partition, and it can be used to securely erase the primary hard drive partition, named Macintosh HD, where all of your data resides.
If your Mac has OS X 10.7 or newer and a solid state drive, also called flash storage, then you should instead use these instructions to securely erase your SSD drive.
If your Mac is running OS X 10.6 or older, use the instructions in this Tech Tip: How to Securely Erase A Mac’s Hard Drive.
The instructions below allow you to securely erase your spinning hard drive on OS X 10.7 (Lion) through OS X 10.10 (Yosemite) as well as macOS 10.12 and higher. In other words, these instructions do not work if your Mac is using OS X 10.11 If you have OS X 10.11 (El Capitan) then check out this article
- Turn on the laptop and immediately press and hold down both the Command key and the R key. This instructs the computer to startup from the Recovery Partition.
- Once you see the Apple logo appear in the middle of the screen you can release the Command and R keys.
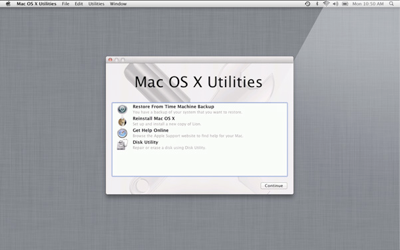
- Give your Mac a couple of minutes to startup, at which point you’ll see a window like the one this one.
- Click on the Disk Utility option from the “Mac OS X Utilities” window.
- In the left pane of the Disk Utility window, click on Macintosh HD (which is your laptop’s internal hard drive).
- In the right pane of the Disk Utility window, click the Erase tab.
- Click the Security Options button.
- I recommend that you select the 7-Pass Erase options. I think you might just see a slider, in which case you slide it to the right side labeled “Most Secure.”
- Click the OK button.
- Click the Erase button.
- You’ll be asked if you’re sure you want to erase it. You’re sure. Go ahead and click the Erase button.
- Sit back and wait many hours for the hard drive to be securely erased. A status window will display the progress being made and provide some very rough time estimates.
- When the secure erase finishes, then click on the Disk Utility menu and select Quit Disk Utility.
- Optionally, if somebody is going to be using this Mac then click on Reinstall Mac OS X from the list of options. Follow the prompts to re-install the Mac operating system. This process typically takes about an hour.