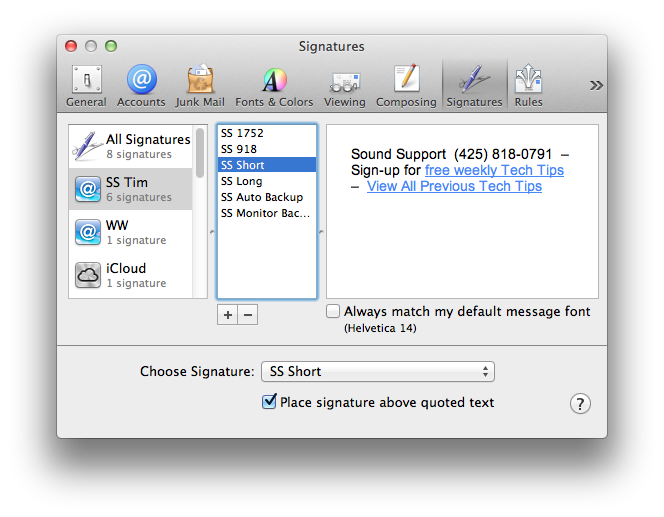
Apple Mail lets you assign one or more signatures to each of your email accounts. This flexibility is great, but the user interface to make this happen is not intuitive. It’s easy to do, but it’s much easier to be shown how to do it the first time. Here are instructions for creating signatures in Mail and linking these signatures to an email account.
Create One or More Signatures
- Open Mail, click on the Mail menu and select Preferences.
- In the Preferences window click the Signatures button.
- Click the + (plus sign) button to add a signature. Use the picture below as a guide.
- The new signature will be listed in the middle column and with the default name of Signature #1.
- Click in the right-hand column and type in the information you want to include in your signature, such as your name, email address, and phone number. [Note: If you’d like to format the text or insert a hyerperlink see instructions below.]
- I suggest that you give your signature a more meaningful name, such as Work or Personal. To rename the signature, click on the name in the middle column, wait a second and then simply type in the new name to over-write the existing name.
- To create additional signatures click the plus sign button again and repeat the instructions above.
Link a Signature to a Specific Email Account
- Open Mail, click on the Mail menu and select Preferences.
- In the Preferences window click the Signatures button.
- You’ll see all existing signatures listed in the middle column. The left-hand column lists all of your email accounts. To link a signature to a specific account simply drag the signature’s name from the middle column to the left-hand column and on top of the desired email account.
- If you’d like to assign multiple signatures to one email account, simply select another signature in the middle column and drag it onto the email account listed in the left-hand column.
In the picture above, you can see that I have 6 signatures linked to my work (SS Tim) email account.
If you’d like to have one of your signatures automatically inserted into all new email messages and replies, click on the pop-up list next to Choose Signature. Select the desired signature from the list.
How to Add Formatted Text to a Signature
Signatures can contain multiple fonts, sizes, and colors. Here’s how you can format the text:
- While you are typing text in the right-hand column select the text that you want to format, then go to the Format menu and select Show Fonts.
- The floating Font window appears.
- Pick a font from the list and select a font size from the right-hand column.
- To change the color click the green square near the top middle area of the Font window. Select a color from the color wheel.
How to Insert a Hyperlink In a Signature
Signatures can contain links to web pages. Here’s how you can add one:
- While you are typing text in the right-hand column select the text that you want to be a hyperlink.
- Go to the Edit menu and select Add Link.
- Enter the full address in the pop-up window that appears. For example, type in http://www.mycompany.com.
- Click the Ok button. The selected text will turn blue with an underline.
As a variation on this last concept, I should point out that you can even add an image to a signature and make it a hyperlink.
While you are typing text in the right-hand column, drag an image from your computer into the right-hand column. I know that you can use .jpg, .gif or .png files. Other types of images might also work.
Simply select that image, go to the Edit menu, select Add Link, then type in the full web page address and click the OK button.

