Do you want to either sell or retire a Mac that has a solid state hard drive (aka flash storage)? If so, it is prudent to securely erase the hard drive beforehand. Here are instructions on how to do this. This procedure will make all of your personal data inaccessible. There are two stages of this process. In phase 1 we will be enabling FileVault, which encrypts everything on your Mac’s hard drive. Then, in phase 2, we will reformat the hard drive which prevents anybody from accessing anything that was stored on the hard drive. I break this process into two phases since phase 1 can be started with about 15 minutes of work but then it’ll take many hours to finish. Start phase 2 after phase 1 finishes.
These instructions assume your Mac is using OS X Lion (aka OS X 10.7) or newer.
Phase 1 – Enabling FileVault
Note: This process can take many hours so you may want to start the encryption at the end of one day and let your Mac’s hard drive get encrypted overnight.
- Click on the Apple menu and select System Preferences
- Click on Security & Privacy
- Click on the FileVault tab
- Click the padlock icon in the lower left corner to unlock this window so you can make changes. You’ll be prompted to enter your Mac user account’s password.
- Click the button to Turn On FileVault encryption
- Follow the prompts to enable FileVault. [You’ll see prompts about creating a Recovery Key and storing it with Apple or using your iCloud Password instead. If you know your AppleID password then this is typically the easier option to choose but either option is a fine choice.]
- If prompted, restart your Mac to let the encryption process begin. This is only required on older versions of the Mac operating system (macOS).
- Sit back and wait while everything on the Mac’s hard drive is encrypted. This can take many hours. You can open up the Security & Privacy system preference pane to monitor progress and view a time estimate.
- After FileVault has finished encrypting the hard drive then click on the Apple menu, select Shutdown.
Phase 2 – Erasing The Data On Your Mac
- Turn on your Mac by pressing its power button, then Immediately press and the Command and R keyboard keys. Continue to depress both keys, until you see the Apple logo, then release these two keys. (This procedure triggers the Mac to startup from its Recovery Partition.)
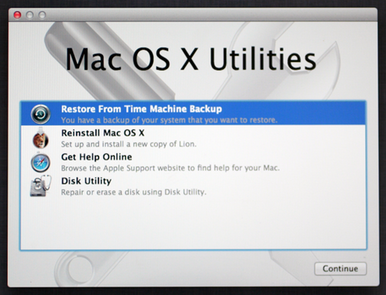
- When your Mac has started up you should see a window similar to the one shown below.
 Click on Disk Utility from the list of options.
- Select your Mac’s hard drive from the left-hand side. If you haven’t renamed your hard drive then it’ll be named Macintosh HD.
- Click the Erase button which appears at the top of the Disk Utility window.
- Click the Erase button which appears in the next window that appears.
- Wait about 20-30 seconds for the hard drive to be erased
- Click on the Disk Utility menu and select Quit Disk Utility.
- Optionally, if somebody is going to be using this Mac then click on Reinstall Mac OS X from the list of options. Follow the prompts to re-install the Mac operating system. This process typically takes about an hour.
